This kit includes one bearing, one ball shaft, one ball bearing, one ball bearing retainer, a small tube of high temperature lubricant, and installation screws.
This dryer lint screen is for laundry centers.
Dryer lint screen captures lint and debris from the exhaust air flowing from the dryer.
Follow the instructions in the owner's manual when installing this part.
The upper felt seal for your dryer is attached to the top edge of the drum support area, and is held there by a high temperature adhesive. It creates a seal where the dryer door opens and closes, so t...
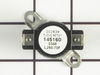
This high limit thermostat has a limit of 260 degrees Fahrenheit. Meaning that it will cut out when the internal dryer temperature reaches 260. This thermostat cuts back in when the temperature drops ...
This is a replacement screw for your washer or dryer. The screw is approximately half an inch in length and is a Phillips-head screw. It screws in from the outside of the drum, into the vane/baffle. T...
This washer fill hose assembly connects your laundry center to hot and cold water lines, ensuring proper water flow during cycles. Built from durable materials, it offers a watertight seal and is easy...
Need a way to keep your dryer safe and protected from overheating? Then the Frigidaire Thermal Limiter is your perfect go-to solution. This genuine part acts as a guard, automatically shutting off you...
$46.88
In Stock
Questions And Answers for 41761733811
Be the first to ask our experts a question about this model!
✖
Ask a Question
Ask our experts a question on this model and we'll respond as soon as we can.
1. Unplug dryer from outlet 2. Using Lg. flat screwdriver, pry under the front edge of the top and release two spring tabs 3. Lift up top and tilt back out of your way 4. Unscrew two phillips scews on inside of front panel 5. Lift up and out the front panel. Two spring clips at bottom. 6. Rlease tension on drum belt at the motor. Access panel at rear of dryer. 7.Unscrew 3 screws from inside, center rear of drum. 8. Remove drum through the front of the dryer. You may have to spread the sides apart a little bit for it to fit 9. Lift up on the rear drum bearing to remove it from the bearing retainer. ( U shaped plastic socket) 10. unsrew 2 screws and remove the bearing retainer, ground ball. Ball retainer is on outside of dryer. 11. Vacuum everything--duct, blower, lint trap, ect. 12. Intall new bearing retainer and grounding ball, an assistant is helpful at this time, one to hold ball retainer on rear of dryer, one to screw it in from the inside 13. reassemble remainder of parts in reverse order.
For the glide, I want to advise people that to replace the entire glide you need to order two front drum glide parts as each is only half.
First, unplug the dryer. Then, open the top so that you can get access to the work area. On each side of the inside front, there is a screw that connects the front panel to the side panels. Unscrew those screws and pull the front panel until it disconnects from the side panels. Be careful as there are wires that are secured to the bottom of the top inside lip of the front panel. One set of wires goes to the light bulb in the dryer door. You don't need to disconnect the wires, but be sure you don't damage the wires by pulling the front panel too far away from the dryer.
Once you have the front panel out of the way, you can see the front drum glide. In my case, one half was loose as the plastic plugs that pop into recesses to hold the glide in place had broken off. Remove the damaged glide section and replace it with the new section, popping the plastic plugs into the recesses. Don't be afraid to slap the glide to lock the plugs in place.
For the felt, I cut the part of the old felt that was pulling away from the front panel. I then used a flat-head screwdriver and wire brush to remove as much of the old adhesive as I could. Then, using the high-heat adhesive that came with the new felt, I put a generous amount on the front panel where the felt needed to go. I used a toothpick to spread the adhesive to get maximum area coverage. I let it set for a minute or two, and then placed the new felt. I used small clamps to keep the felt in place until the adhesive had time to bond. I only kept the clamps in place for 10 minutes.
Once I removed the clamps, I let the felt continue to adhere to the front panel for 24 hours before reassembling the dryer. Again, be careful of the wires connected to the front panel as it appears very easy for them to be pinched or cut when putting the front panel back in place.
When the dryer was reassembled, I plugged it back in and have had no more troubles.
Unplugged the washer/dryer combo unit from the wall.
Slid the unit forward on plastic bags until back and side were accessible (being careful of the dryer duct and washer water lines).
Removed the vented plate on the back to access the motor and idler arm using a LARGE-HEADED Phillips-head screwdriver.
Pulled out the broken belt.
Removed 10 of the 11 screws holding the top on (leave the center front one; undo the front corners last, taking care not to let the front panel slip forward — it supports the drum).
Opened the dryer door and gently pulled the front plate forward, supporting the drum from the inside with one hand so it didn't fall.
Worked the belt around the drum and between the front of the drum and the front panel. Held it mostly taut around the drum to slide it back to the existing belt mark. Grooved rubber side of the belt goes on the inside.
Pushed the front panel back into position while seating the drum on it. Temporarily attached the top with two back and two front screws. (The front panel overlaps the top; the top goes over everything else.)
Scratched my head trying to figure out how the belt goes around the motor shaft and idler arm; searched the web; searched the web some more.
Routed the belt left-to-right over the idler arm pulley, pushed the idler arm to the left, routed the belt around the motor shaft and then up over the drum.
The idler arm should (a) press on the OUTSIDE of the belt, (b) take up all the slack in the belt, and (c) not touch the motor shaft (touching it is what causes the awful noise). The belt should contact the motor shaft past the two nut-like things on the shaft (not between them).
Plugged the unit in and turned the dryer on to test it.
Replaced the other 8 top screws; replaced the vented plate on the back.
Wondered how I ever took having a clothes dryer for granted.