


Product Description
Glide and Spring Kit Specifications
This glide and spring kit contains two three inch springs, four one inch square glides, and two tubes springs. This kit replaces older style round roller glides.

How Buying OEM Parts Can Save You Time and Money
Part Videos
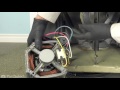
Replacing your Maytag Washer Glide and Spring Kit

Troubleshooting
This part fixes the following symptoms:
Burning smell | Will not agitate | Spins slowly | Will not drain
This part works with the following products:
Washer, Washer Dryer Combo.
This part works with the following products:
Maytag, International, Jenn-Air.
Part# 205000 replaces these:
AP4023752, 2791, 2-11952, 2-4998, 2-5000, 204998, 205000, 211952, 82-500, J28-652, Y204998, Y211952
Customer Reviews
Filter By Rating:
- < Prev
- 1
- Next >
Sort by:
Search filter:
Clear Filter
Your search term must have 3 or more characters.
Keep searches simple. Use keywords, e.g. "leaking", "pump", "broken" or "fit".
Sorry, we couldn't find any existing reviews that matched. Try using some different or simpler keywords.
Brian C - December 19, 2018
Verified Purchase
Washer repair
It worked perfectly and arrived when expected.
- < Prev
- 1
- Next >
Customer Repair Stories
Average Repair Rating: 3.3 / 5.0, 7 reviews.
What's this?
- < Prev
- 1
- Next >
Sort by:
Search filter:
Clear Filter
Your search term must have 3 or more characters.
Keep searches simple. Use keywords, e.g. "leaking", "pump", "broken" or "fit".
Sorry, we couldn't find any existing installation instruction that matched.
The belts were not staying tight enough to agitate properly.
Firstly, remove ac power from washer!
After removing the front panel of the washer (two philips screws), I loosened and removed the plastic motor cover and removed three hex head screws holding the motor. Have someone help you tilt the washer so you can remove the belts by "rolling" them off of the pullies (pump pully and motor pully). What I did was use a chemical degreaser to clean the motor base metal channel where the nylon sliders reside. After doing that and letting it dry, I removed the two old
springs. I ended up reinstalling the old springs because they were not stretched and I installed a new spring (total three) on the right side of the mount. A stiff metal rod with a hook on the end will help you install the springs. Squirt some of the included silicone lubricant on both sides of the motor mount channel and exercise the lube. Reinstall the motor and plastic cover over top of motor. Clean hands and clean belts while you have them out, reinstall belts and front cover and you're finished. My wife said it never ran better!
Other Parts Used:
-
dominic from weirton, WV
-
Difficulty Level:A Bit Difficult
-
Total Repair Time:30 - 60 mins
-
Tools:Nutdriver, Screw drivers
65 of 70 people
found this instruction helpful.
Was this instruction helpful to you?
Thank you for voting!
washer stopped spinng
I replace the belts - 5 min
I tried to replace the glides...I couldn't figure out how to do that..I took out the motor and and the glide mechanism...but I could not get glide braket separate from the motor mount..so i did not do this
I replace the springs and added 1 extra sping...3 instead of 2..it worked
I tried to replace the glides...I couldn't figure out how to do that..I took out the motor and and the glide mechanism...but I could not get glide braket separate from the motor mount..so i did not do this
I replace the springs and added 1 extra sping...3 instead of 2..it worked
Other Parts Used:

-
David from Hartford, WI
-
Difficulty Level:Easy
-
Total Repair Time:30 - 60 mins
-
Tools:Pliers, Screw drivers, Socket set, Wrench (Adjustable)
62 of 79 people
found this instruction helpful.
Was this instruction helpful to you?
Thank you for voting!
Agitator action was slow/weak; Bleach tube kinked
UNPLUG THE MACHINE FIRST!
a) Remove the front panel (use a putty knife to release clips)
b) Fashion a small hook-end out of a coat hanger
c) Install an additional glide spring (2 + 1 = 3) to get extra retraction of vee-belt around drive pulley as follows.
d) Hook end of of the new spring onto rear (back) hole of moving motor mount (observe orientation of existing springs to be sure that you're hooking up spring into hole correctly).
e) Lie on your right side, hold the spring in place with your left hand (go around back of the motor with your left hand).
f) Have someone hold the flashlight as you take a coat hanger and fish for the front end of the spring under the motor glide.
g) With front - end of spring held by coat hanger hook, pull spring towards you and slip spring into front hole of stationary motor mount.
h) Lightly spray in and around glide area with Teflon non-stick dry lube (DuPont or Liquid Wrench dri-lube product line).
Machine agitates like-new now.
Bleach Tube:
a) Remove hose clamps at both ends using a screwdriver.
b) Remove and discard old tube.
c) Slip on the hose clamps and slicker-up the ends of new tube with palmolive liquid detergent and slip onto tub and bleach dispenser.
d)Tighten clamps.
Other Parts Used:


-
Robert from Marlboro, NJ
-
Difficulty Level:Easy
-
Total Repair Time:15 - 30 mins
-
Tools:Screw drivers
25 of 37 people
found this instruction helpful.
Was this instruction helpful to you?
Thank you for voting!
leaking hoses and low tension on belts
opened front of washer, removed motor, replaced glides and springs, installed motor and replaced belts. Installed new hoses and vacuum breaker. Its been a week now and no leaks or other problems.
Other Parts Used:


-
john from COTTAGE GROVE, MN
-
Difficulty Level:Easy
-
Total Repair Time:1- 2 hours
-
Tools:Nutdriver, Pliers, Socket set
5 of 7 people
found this instruction helpful.
Was this instruction helpful to you?
Thank you for voting!
No tub spin, burning smell.
Partselect.com gave me a very helpful list of parts per symptom. Said that there is an 88% chance that belts were my problem. Since the machine is 200 miles away I ordered two other parts as well. Belts fixed it! Took front cover off (not totally necessary). When the machine is tilted back belts are exposed underneath. Two belts later I was up and running. This site is really great.
Other Parts Used:
-
Ginsbach from PHOENIX, AZ
-
Difficulty Level:Really Easy
-
Total Repair Time:Less than 15 mins
-
Tools:Screw drivers
4 of 6 people
found this instruction helpful.
Was this instruction helpful to you?
Thank you for voting!
Drum not agitating all the time
Removed front door from washer lifted front of washer off floor and removed belt’s put washer back on floor
Removed motor and slide
Cleaned and replaced slides and greased put back in washer secured
Then lifted front of washer back up replaced new belts and started the washer up worked great put front of washer back on done
Great instructions that came with parts
Removed motor and slide
Cleaned and replaced slides and greased put back in washer secured
Then lifted front of washer back up replaced new belts and started the washer up worked great put front of washer back on done
Great instructions that came with parts
Other Parts Used:
-
Michael from PERRY, OH
-
Difficulty Level:Easy
-
Total Repair Time:30 - 60 mins
-
Tools:Nutdriver, Pliers, Screw drivers, Socket set
2 of 2 people
found this instruction helpful.
Was this instruction helpful to you?
Thank you for voting!
Would not spin with load
Received wrong springs for my model had too use combo old spring with the two new (too long) springs to get the tension on the belts. For now it working. Did not contact you due shipping took so long and two delay date change by FedEx ground. I didn't want to go thru another delivery nightmare. Thanks for the time.
Other Parts Used:
-
ANGEL from JACKSONVILLE, FL
-
Difficulty Level:Easy
-
Total Repair Time:30 - 60 mins
-
Tools:Pliers, Screw drivers, Socket set, Wrench set
2 of 4 people
found this instruction helpful.
Was this instruction helpful to you?
Thank you for voting!
- < Prev
- 1
- Next >
Questions and Answers
We're sorry, but our Q&A experts are temporarily unavailable.
Please check back later if you still haven't found the answer you need.
Related Parts

$52.43
In Stock
Belt Kit
$52.43
PartSelect Number: PS2005284
This kit includes both the drive belt and the pump belt which are both "V" shaped. 
$27.35
In Stock
Produce Preserver Filter
$27.35
PartSelect Number: PS3503014
Fresh Flow Produce Preserver is made for your refrigerator to help keep produce fresh for longer by absorbing the chemical, ethylene, that causes your fruits and vegetables to ripen quicker. Your produce could be fresh f... 
$16.01
In Stock
Affresh Washing Machine Cleaner - 3 pack
$16.01
PartSelect Number: PS1960673
This front load washer cleaner removes odor-causing residue. Use it once a month and it will keep your machine fresh and clean. Package comes with 3 tablets. 
$29.30
In Stock

$42.42
In Stock
Solid Element Cleaner
$42.42
PartSelect Number: PS474316
This solid element restorer is for ranges and cooktops. Solid element restorer restores and protects solid elements from rusting and spotting. Follow the instructions on the label when using this product. 
$39.34
In Stock
Oven Cleaning Gel
$39.34
PartSelect Number: PS12366520
This low-odor gel, easily cleans away tough burnt-on deposits at room temperature. Apply the gel evenly on the cooled oven surface. Leave the gel to set overnight then wipe away with a clean cloth. 
$22.95
In Stock
Cooktop Cleaning Cream
$22.95
PartSelect Number: PS12717774
Make your cooktop shine with Frigidaire ReadyClean Glass and Ceramic Cleaner. Our scratch-free, streak-free formula removes smudges, grease, burnt-on food, dirt and oil, while protecting and polishing to repel dust and d...
Model Cross Reference
This part works with the following models:
PartSelect Number: PS2017149
Manufacturer Part Number: 205000
Manufacturer Part Number: 205000
Brand
Model Number
Description