


Product Description
Door Handle - Black Specifications
Handle ONLY. Black in color.

How Buying OEM Parts Can Save You Time and Money
Part Videos
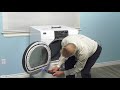
Replacing your Kenmore Dryer Door Handle - Black

Troubleshooting
This part fixes the following symptoms:
Door won’t close
This part works with the following products:
Dryer.
This part works with the following products:
Kenmore, Whirlpool.
Part# WP8559751 replaces these:
AP6013245, 8519331, 8519332, 8559750, 8559751, WP8559750
Customer Reviews
Filter By Rating:
- < Prev
- 1
- 2
- 3
- Next >
Sort by:
Search filter:
Clear Filter
Your search term must have 3 or more characters.
Keep searches simple. Use keywords, e.g. "leaking", "pump", "broken" or "fit".
Sorry, we couldn't find any existing reviews that matched. Try using some different or simpler keywords.
James A - July 14, 2023
Verified Purchase
The part was exactly as advertised. The installation was easy.
Correct part. Installation instructions were available and I printed them out. I had no trouble installing the new handle even though I am 80. Thanks. Also very quick delivery.
Caroline D - November 14, 2022
Verified Purchase
Very easy repair, part worked great
The part was received very quickly and in great shape. Easy to install used the instructions off your website and it was simple.
Mark K - November 2, 2022
Verified Purchase
easy to find given age of dryer
Part came on time and fit perfectly. Easy to install after viewing video. Was even able to swing the door 180 degrees. Handle is working well.
ANDRE J - May 30, 2022
Verified Purchase
Easy repair - worked as expected.
Fast shipping - Perfect fit
Robert B - March 10, 2022
Verified Purchase
The part broke after used only three times. Not impressed at all
The part broke off after only being used three times. Not impressed with it

March 16, 2022
Thank you for your review. I’m sorry to hear that happened, we will be in touch soon to help fix this issue.
Colin D - December 4, 2021
Verified Purchase
Fast shipping and easy repair
Just what I needed to fix the door.
John P - May 25, 2021
Verified Purchase
Easy Repair
Came fast and works really well. Easy to install
Keith K - February 17, 2021
Verified Purchase
Dryer door handle
PART SELECT was very prompt getting the handle shipped. It was easy to attach to the door. The whole transaction was carried out online and was very well communicated as to shipping and delivery.
Sandra L - December 31, 2020
Verified Purchase
Quick shipping and easy fix
Part was the right part with a helpful video on how to make the repair.
Denis D - May 9, 2020
Verified Purchase
Fast delivery and very easy to install the door handle.
The part arrived in great condition and the instructions were very easy to follow. It only took a few minutes to install the door handle. It fit perfectly! Thank you so much. Denis Doré
- < Prev
- 1
- 2
- 3
- Next >
Customer Repair Stories
Average Repair Rating: 4.2 / 5.0, 25 reviews.
What's this?
- < Prev
- 1
- 2
- 3
- Next >
Sort by:
Search filter:
Clear Filter
Your search term must have 3 or more characters.
Keep searches simple. Use keywords, e.g. "leaking", "pump", "broken" or "fit".
Sorry, we couldn't find any existing installation instruction that matched.
Handle on Kenmore he3 dryer door broke off
1) Removed six smaller Phillips head screws from around the inside of the dryer door. This allowed the black plastic front piece of the dryer door to come off.
2) Unscrewed the two screws holding the damaged door handle and removed the old door handle.
3) Screwed new door handle on to the black plastic front piece of the dryer door
4) Replaced black plastic front piece on the dryer door and screwed the original six screws back in.
2) Unscrewed the two screws holding the damaged door handle and removed the old door handle.
3) Screwed new door handle on to the black plastic front piece of the dryer door
4) Replaced black plastic front piece on the dryer door and screwed the original six screws back in.
Other Parts Used:
-
Colleen from Lenox, MI
-
Difficulty Level:Easy
-
Total Repair Time:Less than 15 mins
-
Tools:Screw drivers
259 of 276 people
found this instruction helpful.
Was this instruction helpful to you?
Thank you for voting!
Lower Rack Wheel Replacement
Popped the old melted wheels off and simply clicked the new ones into place. It took less than 2 minutes.
Other Parts Used:

-
Peter from Port Barrington, IL
-
Difficulty Level:Really Easy
-
Total Repair Time:Less than 15 mins
69 of 131 people
found this instruction helpful.
Was this instruction helpful to you?
Thank you for voting!
Broken Door Handle
I followed the instructions someone with the same problem had listed on the Internet. Their instructions were to the letter. It saved me calling the dealer for a repairman to install without the associated repair cost. The instructions are as follows:
"When you open the dryer door, you will see 12 screws around the plastic window and 2 more screws at the bottom of the door beneath this window (just look down and you’ll see the screws). Of all these screws, you only have to remove 6. They are Phillips head screws and they are smaller than all the other screws. The 8 other screws are for the door hinge holes and to mount the plastic window. The 4 screws for the plastic window are NOT Phillips head screws.
Remove the 6 smaller screws, 4 around the window and two below. You then can slip off the door cover from the outside, and voila you will see the door handle mounting screws." It's very simple and done within 15 minutes. By following theses instructions you won't mistakenly remove screws holding the dryer window, which could fall, and brake.
Hope this helps others and thanks to PartSelect for having the replacement part. I'll check with them first for any other appliance replacement part(s).
Other Parts Used:
-
Darrell from Midlothian, VA
-
Difficulty Level:Really Easy
-
Total Repair Time:Less than 15 mins
-
Tools:Screw drivers
58 of 59 people
found this instruction helpful.
Was this instruction helpful to you?
Thank you for voting!
broken handle on dryer door with a window
Undid 12 philips screws on inside of door. Four were star screws (and I have a star screw driver) but I found out after removing these that they did not need to be removed (they held the glass window in place). Once I removed the screws, the outer plastic band (to which the handle was screwed) came right off, I replaced the handle and put the outer band back on. Easy!
Other Parts Used:
-
Adrian L from Houston, TX
-
Difficulty Level:Easy
-
Total Repair Time:15 - 30 mins
-
Tools:Screw drivers
39 of 41 people
found this instruction helpful.
Was this instruction helpful to you?
Thank you for voting!
Handle broke on HE3
After reading a note on partselect.com about replacing the handle, I removed the 6 small Phillips screws from the inside of the door. This allowed the black plastic on the front of the door to be removed. After that changing the handle was easy - just remove the two screws holding it into the black plastic, and attach the new handle. Put the black plastic back on the dryer door, screw the 6 Phillips screws back in, and I was done.
Other Parts Used:
-
Peter from Boulder, CO
-
Difficulty Level:Easy
-
Total Repair Time:Less than 15 mins
-
Tools:Screw drivers
32 of 33 people
found this instruction helpful.
Was this instruction helpful to you?
Thank you for voting!
doo handle broken
I followed the directions of a previous customer, using a Phillips screwdriver to remove only the Phillips screws on the inside of the door. Removed the outer plastic ring around the door. Replaced the handle (attached by two screws) and put the plastic ring with a new handle back on the outside of the door.
Other Parts Used:
-
Keith from Anthem, AZ
-
Difficulty Level:Easy
-
Total Repair Time:15 - 30 mins
-
Tools:Screw drivers
14 of 15 people
found this instruction helpful.
Was this instruction helpful to you?
Thank you for voting!
Broken handle on dryer door
Don't take the star screws and the screws at the hinge out. Unnecessary
Other Parts Used:
-
Teresa from Baltimore, MD
-
Difficulty Level:Easy
-
Total Repair Time:15 - 30 mins
-
Tools:Screw drivers
13 of 13 people
found this instruction helpful.
Was this instruction helpful to you?
Thank you for voting!
Replace broken handle
Only need to remove 6 small phillips head screws. 4 around top half (inside on door) plus 2 under door window (you have to bend down to see. Pull outer plastic ring off, remove 2 screws holding handle on, replace handle and reverse process.
Other Parts Used:
-
Nancy from Anchorage, AK
-
Difficulty Level:Really Easy
-
Total Repair Time:Less than 15 mins
-
Tools:Screw drivers
11 of 11 people
found this instruction helpful.
Was this instruction helpful to you?
Thank you for voting!
broken handle
Take out 8-10 screws on the inside of the door. Make sure you note which screws go back in the correct spots. The screws are more than one size. Plastic casing pops off then you remove 2 screws for the handle. Put handle on. Put plastic casing back on and screw back the 8-10 screws. Very easy.
Other Parts Used:
-
Karen from Charlotte, NC
-
Difficulty Level:Really Easy
-
Total Repair Time:Less than 15 mins
-
Tools:Screw drivers
9 of 12 people
found this instruction helpful.
Was this instruction helpful to you?
Thank you for voting!
The plastic handle on the door broke off
I removed all of the screws on the inside of the door. Unfortunately, I found out that I only needed to remove four of the screws after the glass fell out of the door. After re-installing the glass and removing the correct four screrws, I figured out that I had to pry off the plastic face plate to get to the two screws that held on the handle. After removing these screws, I was able to get the broken handle out and the new handle in. I then reinstalled the plastic face plate and replaced the four screws that held it in place.
Other Parts Used:
-
Bernadine from Anchorage, AK
-
Difficulty Level:A Bit Difficult
-
Total Repair Time:30 - 60 mins
-
Tools:Screw drivers
6 of 9 people
found this instruction helpful.
Was this instruction helpful to you?
Thank you for voting!
- < Prev
- 1
- 2
- 3
- Next >
Questions and Answers
We're sorry, but our Q&A experts are temporarily unavailable.
Please check back later if you still haven't found the answer you need.
- < Prev
- 1
- Next >
Sort by:
Search filter:
Clear Filter
Your search term must have 3 or more characters.
Keep searches simple. Use keywords, e.g. "leaking", "pump", "broken" or "fit".
Sorry, we couldn't find any existing answers that matched.Try using some different or simpler keywords, or submit your new question by using the "Ask a Question" button above!
William
April 4, 2019
Can i get this handle in white?
For model number 110.95871400

Hello William, Thank you for contacting us. I have researched the model you have provided and have found the part you are looking for is PartSelect Number PS11723146. Thank you for your inquiry, good luck with this repair!
7 people found this helpful.
Was this helpful?
Thank you for voting!
- < Prev
- 1
- Next >
Related Parts

$27.35
In Stock
Produce Preserver Filter
$27.35
PartSelect Number: PS3503014
Fresh Flow Produce Preserver is made for your refrigerator to help keep produce fresh for longer by absorbing the chemical, ethylene, that causes your fruits and vegetables to ripen quicker. Your produce could be fresh f... 
$16.01
In Stock
Affresh Washing Machine Cleaner - 3 pack
$16.01
PartSelect Number: PS1960673
This front load washer cleaner removes odor-causing residue. Use it once a month and it will keep your machine fresh and clean. Package comes with 3 tablets. 
$29.30
In Stock

$42.42
In Stock
Solid Element Cleaner
$42.42
PartSelect Number: PS474316
This solid element restorer is for ranges and cooktops. Solid element restorer restores and protects solid elements from rusting and spotting. Follow the instructions on the label when using this product. 
$39.34
In Stock
Oven Cleaning Gel
$39.34
PartSelect Number: PS12366520
This low-odor gel, easily cleans away tough burnt-on deposits at room temperature. Apply the gel evenly on the cooled oven surface. Leave the gel to set overnight then wipe away with a clean cloth. 
$22.95
In Stock
Cooktop Cleaning Cream
$22.95
PartSelect Number: PS12717774
Make your cooktop shine with Frigidaire ReadyClean Glass and Ceramic Cleaner. Our scratch-free, streak-free formula removes smudges, grease, burnt-on food, dirt and oil, while protecting and polishing to repel dust and d...
Model Cross Reference
This part works with the following models:
PartSelect Number: PS11746467
Manufacturer Part Number: WP8559751
Manufacturer Part Number: WP8559751
Brand
Model Number
Description