


Product Description
Tine row Clip Specifications
This clip attaches the Tine row to the rack. Sold individually.

How Buying OEM Parts Can Save You Time and Money
Part Videos
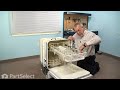
Replacing your Kenmore Dishwasher Tine row Clip

Troubleshooting
This part fixes the following symptoms:
Not cleaning dishes properly
This part works with the following products:
Dishwasher.
This part works with the following products:
Kenmore, KitchenAid, Whirlpool.
Part# WP8268816 replaces these:
AP6012260, 8268816, 9743017
Customer Reviews
Filter By Rating:
- < Prev
- 1
- Next >
Sort by:
Search filter:
Clear Filter
Your search term must have 3 or more characters.
Keep searches simple. Use keywords, e.g. "leaking", "pump", "broken" or "fit".
Sorry, we couldn't find any existing reviews that matched. Try using some different or simpler keywords.
Karen P - February 26, 2022
Verified Purchase
Tine Row Clip
This part is supposed to fit my dishwasher model, but does not fit at all. The bars on my dishwasher are too wide for the clips, and the spacing is not correct. I will be returning the parts.

March 5, 2022
Hi Karen,
Thank you for your review. Please accept our apologies for this situation. We will be in touch with you shortly regarding your order.
Ed W - September 11, 2019
Verified Purchase
Quick and easy
Exact part that went in easy. But to be honest I thought the price was a bit high for such a tiny piece of plastic.
Michael S - January 3, 2019
Verified Purchase
Easy Repair
The Tine Row Clip was exactly what I required for my dishwasher. The install went well and rack is functioning properly again. Thanks
Gary S - October 15, 2018
Verified Purchase
Upper rack water supply kit and tine clip replacement
Parts did get delivered in an orderly fashion. Felt the cost of the tine clips is a bit excessive. Had difficulty figuring out which way the clips go onto the rack as I had removed the old ones prior to getting the new one. But once they were on they work fine.
- < Prev
- 1
- Next >
Customer Repair Stories
Average Repair Rating: 4.2 / 5.0, 24 reviews.
What's this?
- < Prev
- 1
- 2
- 3
- Next >
Sort by:
Search filter:
Clear Filter
Your search term must have 3 or more characters.
Keep searches simple. Use keywords, e.g. "leaking", "pump", "broken" or "fit".
Sorry, we couldn't find any existing installation instruction that matched.
Small Plastic clip that holds the spline shaft upright in dish tray broken
This part is extremely delicate if put in or if you try and force it on. You will break more than you fix. There is a definite trick and when you know it, the installation is (no pun) a snap. The trick is to place the small plastic in such a position that the only "snap' required for installation is on the heaviest and thickest port of the small part. Then carefully use the pliers to pinch only between the plastic covered bar and the heavy part of the plastic clip...blip, it goes right on. Try it any other way and you will break more than you can fix....
Other Parts Used:
-
Richard from Larkspur, CO
-
Difficulty Level:Difficult
-
Total Repair Time:15 - 30 mins
-
Tools:Pliers
26 of 30 people
found this instruction helpful.
Was this instruction helpful to you?
Thank you for voting!
Poor washing - water not coming out of jets at full power
Bottom wash arm bearing and seal were severely worn and leaking. Replaced in about one minute with new parts from PartSelect.com, and took the opportunity to clean out the arm -- stringy, fibrous matter was clogging two jets.
Top arm horizontal rubber supply tube was disintegrating and leaked. Replace with Spray Arm Kit -- this took maybe two minutes!
Lastly, two to of the upper right-rear folding rack tine clips were broken -- replacement was difficult as the old, broken clips were very stiff and came off only after much physical persuasion! New clips were installed easitly -- in a "snap". Time ~ 5 minutes.
Best of all, the new parts were delivered to my home within 36 hours of my internet order. I thought the prices were fair, too. Thanks.
Other Parts Used:


-
Stanley from West Sand Lake, NY
-
Difficulty Level:Really Easy
-
Total Repair Time:Less than 15 mins
7 of 8 people
found this instruction helpful.
Was this instruction helpful to you?
Thank you for voting!
Broken clips
There were two somewhat difficult parts: identifying the correct clip (first time I got it wrong and had to reorder), and attaching the new clips in the proper orientation without breaking them.
The correct clips have a snap-in feature to hold a wire fence upright. Two tines of the fence snap into the clip, which attaches to the lateral wires in the upper basket.
To remove the broken clips, I pressed the flat blade of a large screwdriver against the open side of each, noting which wire each came from. I measured the distance between the two wires for the next step.
To install the new clips, I first attached them to the moveable fence. This is because (1) the clip has extremely complex geometery and it took a while to figure how it should be installed (I had no model because the old clips were completely destroyed) and (2) the notch for the fence is quite rigid on one side, and quite delicate on the other, and it took a bit of force to get the the thick bottom wire of the fence to seat properly without breaking the delicate part of the clip. There is no way to put the fence into the clip if you have first installed it onto the wire basket without breaking the clip because the beefy side is not flexible. I used the flat blade of the screwdriver on the beefy side and pinched the bottom of the fence into it with my thumb.
Each clip must straddle one of the tines of the fence, so the tine can swivel into the upper part of the clip to stand upright. This is definitiely a spatial relationship challenge and it took a few minutes of trial, error, and visualization to figure out. You must also be sure that the tines you select correspond to the distance between the two locations on the wire basket where they will attach.
Once the clips were on the fence, I rotated the fence so that the tines locked. Then I attached the clips to the basket, using the flat of the screwdriver blade and a steady pressure to snap it on.
Other Parts Used:
-
Ray from San Rafael, CA
-
Difficulty Level:A Bit Difficult
-
Total Repair Time:Less than 15 mins
-
Tools:Screw drivers
6 of 7 people
found this instruction helpful.
Was this instruction helpful to you?
Thank you for voting!
broken clips that hold up vertical dishwasher racks.
Very easy to snap in. I would recommend to make them more slippery to snap in. Maybe use a little soap or place them in hot water before you place them on dishwasher tray.
Other Parts Used:

-
William from Atlanta, GA
-
Difficulty Level:Really Easy
-
Total Repair Time:Less than 15 mins
4 of 4 people
found this instruction helpful.
Was this instruction helpful to you?
Thank you for voting!
Tinerow clips were broke
No problem. Just snapped new parts in place. My wife has been after me for 2 years to fix this. I had it looked up on the internet an ordered and paid for in 10 minutes 3 days later the parts arrived and in 10 minutes job was done.
Other Parts Used:

-
Terry from Pevely, MO
-
Difficulty Level:Really Easy
-
Total Repair Time:Less than 15 mins
3 of 5 people
found this instruction helpful.
Was this instruction helpful to you?
Thank you for voting!
All of these little clips broke over time
I read a couple of stories about how easy these are to break when installing. So I used extra care, and made sure to push carefully in just the right places.
What worked for me was raising the tines of the cup rack to apply some leverage as I squeezed the clips into place with my fingers. No tools. No broken clips. No injuries. No cursing.
What worked for me was raising the tines of the cup rack to apply some leverage as I squeezed the clips into place with my fingers. No tools. No broken clips. No injuries. No cursing.
Other Parts Used:
-
Leif from Seattle, WA
-
Difficulty Level:Really Easy
-
Total Repair Time:Less than 15 mins
2 of 2 people
found this instruction helpful.
Was this instruction helpful to you?
Thank you for voting!
Flex tines wouldn't remain up due to broken clips.
First, I removed the tines which were still connected to the top rack by the unbroken parts of 3 clips. (The part of the clip which is subject to breakage is the top, where it allows the tines to be clipped up or released and laid down.) I left the broken clips on the rack as a guide to where to install the new ones. I then attached the new clips to the tines, which is like assembling a puzzle. It would be helpful to replace one clip before all 3 break, so you have an illustration, but it's fairly easy to figure out how to attach the clip as long as you realize the tines need to be released and folded down, or clipped in the up position. With all 3 clips attached to the tines, simply pop the broken clips off the rack and attach the tines to the rack with the new clips. I appreciate the advice from the users who warned against breaking the clips with a tool. It's not really necessary to soak them in hot water. My advice is to use only fingers for installation. Brute force is not necessary... just position and pinch.
Other Parts Used:
-
Terri from Pleasanton, CA
-
Difficulty Level:Easy
-
Total Repair Time:Less than 15 mins
2 of 2 people
found this instruction helpful.
Was this instruction helpful to you?
Thank you for voting!
Broken tinerow clips left cup rack "flapping -in-the-breeze".
Removed top rack from dishwasher, removed broken clips - 2 out of three were snapped, and replaced them with FOUR - spaced more regularly to take the stress since this is the second time 2 out of the 3 had snapped. Simple job; rack swings well now, folds easily and clips securely upright.
Other Parts Used:

-
Stanley from West Sand Lake, NY
-
Difficulty Level:Really Easy
-
Total Repair Time:Less than 15 mins
2 of 3 people
found this instruction helpful.
Was this instruction helpful to you?
Thank you for voting!
Tine clips were broken
Removed the top glasses rack from the dishwasher and removed the broken clips from the rack bar by popping them off with my fingers. Could have used a screw driver if fingers weren't strong enough.
Took the new Tine Clips from the plastic packs and used the other side of the rack (older clips) as an example to position the clips on the rack tines (nomenclature??). Aligned all three clips then lowered the assembled parts into position then pressed one side of each clip into the correct position, then did the other side. If you tried to press the single clip one at a time it would mis-align the other 2 clips. Easy does it!!!
Took the new Tine Clips from the plastic packs and used the other side of the rack (older clips) as an example to position the clips on the rack tines (nomenclature??). Aligned all three clips then lowered the assembled parts into position then pressed one side of each clip into the correct position, then did the other side. If you tried to press the single clip one at a time it would mis-align the other 2 clips. Easy does it!!!
Other Parts Used:
-
Donald from BOULDER, CO
-
Difficulty Level:Very Easy
-
Total Repair Time:15 - 30 mins
1 person
found this instruction helpful.
Was this instruction helpful to you?
Thank you for voting!
Plastic tinerow clips were broken.
The clip configuration combined with how the tine bar was suppose to snap in and out of the clip was actually quite confusing but once I was able to figure out how to slip the clip onto the tine bar the repair took less than 10 seconds.
Other Parts Used:
-
Dennis from ANTIOCH, IL
-
Difficulty Level:Really Easy
-
Total Repair Time:Less than 15 mins
1 person
found this instruction helpful.
Was this instruction helpful to you?
Thank you for voting!
- < Prev
- 1
- 2
- 3
- Next >
Questions and Answers
We're sorry, but our Q&A experts are temporarily unavailable.
Please check back later if you still haven't found the answer you need.
- < Prev
- 1
- Next >
Sort by:
Search filter:
Clear Filter
Your search term must have 3 or more characters.
Keep searches simple. Use keywords, e.g. "leaking", "pump", "broken" or "fit".
Sorry, we couldn't find any existing answers that matched.Try using some different or simpler keywords, or submit your new question by using the "Ask a Question" button above!
Laura
December 13, 2017
Does part # wp8268816 work on both the right and the left hand side of the upper tine racks?
For model number Kuds25shbl1

Hi Laura,
Thank you for your question. Based on the diagram, the clip should work in the left, right or the center of the tine row. I hope this helps. Thank you and have a great day!
4 people found this helpful.
Was this helpful?
Thank you for voting!
- < Prev
- 1
- Next >
Related Parts

$16.15
In Stock

$27.35
In Stock
Produce Preserver Filter
$27.35
PartSelect Number: PS3503014
Fresh Flow Produce Preserver is made for your refrigerator to help keep produce fresh for longer by absorbing the chemical, ethylene, that causes your fruits and vegetables to ripen quicker. Your produce could be fresh f... 
$16.01
In Stock
Affresh Washing Machine Cleaner - 3 pack
$16.01
PartSelect Number: PS1960673
This front load washer cleaner removes odor-causing residue. Use it once a month and it will keep your machine fresh and clean. Package comes with 3 tablets. 
$29.30
In Stock

$42.42
In Stock
Solid Element Cleaner
$42.42
PartSelect Number: PS474316
This solid element restorer is for ranges and cooktops. Solid element restorer restores and protects solid elements from rusting and spotting. Follow the instructions on the label when using this product. 
$39.34
In Stock
Oven Cleaning Gel
$39.34
PartSelect Number: PS12366520
This low-odor gel, easily cleans away tough burnt-on deposits at room temperature. Apply the gel evenly on the cooled oven surface. Leave the gel to set overnight then wipe away with a clean cloth. 
$22.95
In Stock
Cooktop Cleaning Cream
$22.95
PartSelect Number: PS12717774
Make your cooktop shine with Frigidaire ReadyClean Glass and Ceramic Cleaner. Our scratch-free, streak-free formula removes smudges, grease, burnt-on food, dirt and oil, while protecting and polishing to repel dust and d...
Model Cross Reference
This part works with the following models:
PartSelect Number: PS11745467
Manufacturer Part Number: WP8268816
Manufacturer Part Number: WP8268816
Brand
Model Number
Description