The lower spray arm is mounted to the bottom of your dishwasher tub, and it rotates and sprays water to clean the dishes in the lower dish rack. This spray arm is made of gray plastic, and is approximately 20 inches in width. The lower spray arm will not spin if it has become clogged with debris and hard water deposits from your dishwasher, if it has become jammed by silverware, causing it to melt, or if the bottom of the spray arm has become disconnected from the bottom of the tub. If the spray arm encounters any of these issues, it will need to be replaced. To replace the spray arm, remove the lower dish rack and simply unscrew the old arm. Screw the new spray arm in until it locks into place.
How Buying OEM Parts Can Save You Time and Money
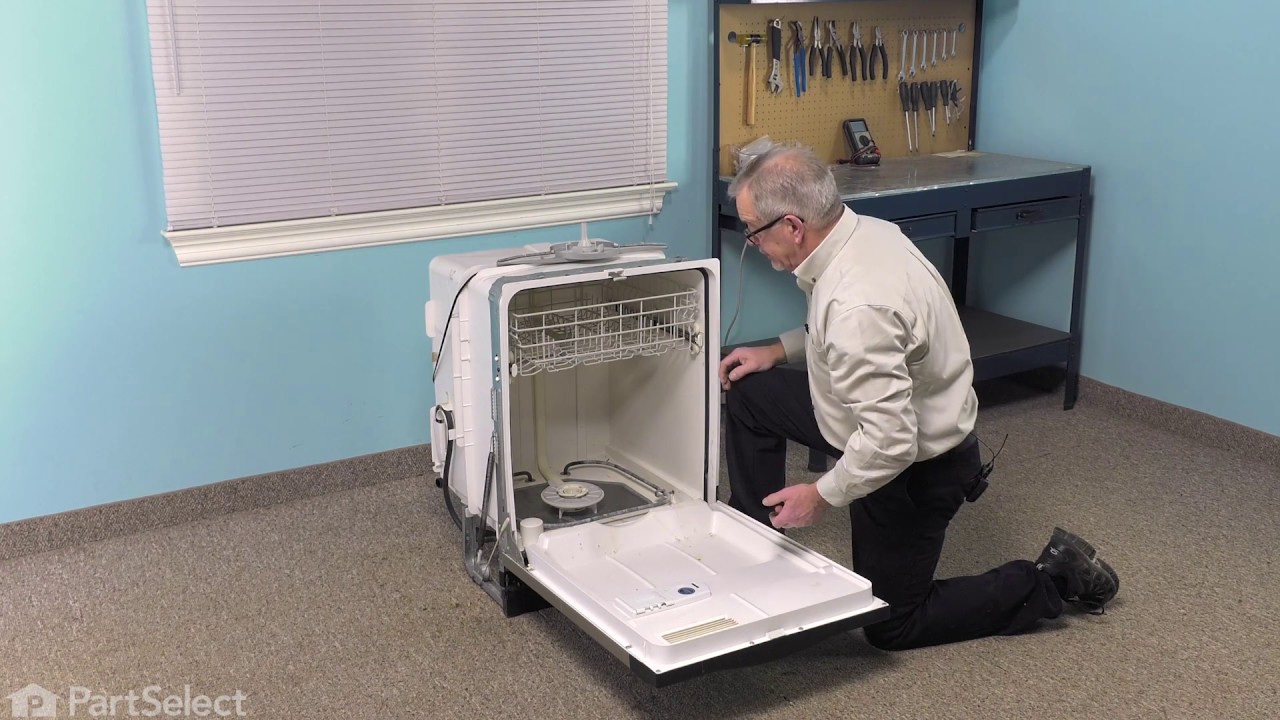
Part Videos
Replacing your General Electric Dishwasher Lower Spray Arm - Gray
Keep searches simple. Use keywords, e.g. "leaking", "pump", "broken" or "fit".
Sorry, we couldn't find any existing reviews that matched. Try using some different or simpler keywords.
★★★★★
★★★★★
Josee D - May 12, 2023
Verified Purchase
Easy to repair.
My husband did it by his self. Usually I have to be with him to translate the Instructions. Thank you
★★★★★
★★★★★
Timothy D - January 12, 2019
Verified Purchase
The repair was easy as falling of a log
I have re placed the upper arm and the lower arm the GE profile dishwasher is 10 years old , and now works just like it did 10 years ago, also the parts arrived with in 3days, wonderful service . thank you Part Select.
< Prev
1
Next >
Customer Repair Stories
Average Repair Rating: 4.8 / 5.0, 20 reviews.
What's this?
< Prev
1
2
Next >
Sort by:
Search filter:
Clear Filter
Your search term must have 3 or more characters.
Keep searches simple. Use keywords, e.g. "leaking", "pump", "broken" or "fit".
Sorry, we couldn't find any existing installation instruction that matched.
Diswasher wasn't cleaning the dishs because the spray arms were clogged with calcium deposits.
Replacement of the arms is very simple, the bottom arm pulls out after turning it counter clockwise, no tool needed. The upper arms need the use of a nut driver or simlar tool to remove the hex screws holding them to the water supply tubes. The hardest part of the repair will be removing the top dish tray. This requires twisting the door slide end retainers outward to remove them and then the dish tray will slide out allowing easy removal of the arm. The top arm is mounted the body of unit. This problem would not have occurred if there was an inline filter on the cold side to filter out calcium (whole house filter). Another way to have corrected this without the purchase of parts would be to run the dishwasher on the rinse cycle 3 or 4 times using 1 cup of lime away on each rinse and also by removing the arms and soaking the arms in a 50/50 solution of water and lime away for 24 hours. This will break down the calicum and enable the arms to be cleaned using a garden hose. New parts however save time and labor in cleaning the arms, however the main drain and supply lines to the arms still need the rinsing prior to replacing the new parts.
Once upon a kitchen dreary. Washing dishes made me weary. All the dishes would not clean. Gunk clogged up my filter screen. The lower spray arm stuck and rattled. With flying muck my dishes battled. The muck had won and I had lost. The repairman said it would really cost. And so I did a google search. Partselect got me out of a lurch. Correct parts were easy to choose and service so quick I couldn't lose. I took off the old parts and tightened the new No tools were needed my fingers flew. And now my dishes come out clean I feel competent and frugal, you know what I mean?
My dishwasher was doing a terrible job of cleaning. It was leaving food on dishes, and wasn't dissolving all the detergent. I replaced all the spray arms and the filter, as they seemed clogged, and god knows how old. It's a super easy repair, and the dishwasher now works as if it were brand new.
I pulled out the racks and decided to take off the upper (mid) arm. It came off with an adjustable wrench. When I looked at the arm I could tell that some of the holes were blocked. Some debris had gotten lodged in the holes and were blocking the water flow. I used tweezers to remove the debris and it solved the problem. I then pulled out the lower arm and cleaned it with warm water. There were soap deposits and I wondered if other debris could be blocking this as well. Finally I went onto the web site and saw that for $40 including shipping I could replace these parts with brand new parts. I did and the machine washes like new again.
Metal cover broke off of lower spray arm and gluing didn't work.
Turned spray arm while lifting upward to remove the old part. Place new spray arm over the water outlet and turned with light downward pressure until properly seated.
It less time to do the repair than it took to open the box and unwrap the part!
Other Parts Used:
Steven from Holland, PA
Difficulty Level:
Really Easy
Total Repair Time:
Less than 15 mins
14 of 14 peoplefound this instruction helpful.
Was this instruction helpful to you?
Thank you for voting!
Front gasket leak, jets clogged, keypad shorted out
Based on parts select diagrams, I removed the sprayer arms and replaced them along with new washers/bushings. I simply pulled the front gasket out
This was very easy. 1) roll out lower rack, 2) rotate lower arm slightly counter-clockwise and lift it out, 3) install new lower arm by dropping into position and rotating clockwise. 4) roll in lower rack, and roll out upper rack, 5) use a nut driver to remove the retaining bolt/screw from the upper arm - it's in the center of the upper arm and you have to work from underside of upper rack, 6) remover upper arm, 7) install new upper arm by holding in position and re-inserting the retaining bolt/screw. 8) Tighten the retaining screw and make sure upper arm freely rotates.
clunking sound every second when lower spray rotating
get fingers between lower spray arm and drive flange - rotate arm counter-clock wise and lift off...the arm was warped and hitting inside of lower door liner.
I watched the video, read the instructions and went to work. This was the easiest repair I have ever done. I'm 71 and if I can do all 3 spray arms in a total of 15 minutes, anyone can. The hardest part was getting up off the floor when I was finished. The spray arms were all clogged, we have very hard water.
We're sorry, but our Q&A experts are temporarily unavailable.
Please check back later if you still haven't found the answer you need.
5 questions answered by our experts.
< Prev
1
Next >
Sort by:
Search filter:
Clear Filter
Your search term must have 3 or more characters.
Keep searches simple. Use keywords, e.g. "leaking", "pump", "broken" or "fit".
Sorry, we couldn't find any existing answers that matched.Try using some different or simpler keywords, or submit your new question by using the "Ask a Question" button above!
Fred
August 1, 2017
How do I remove the bottom spray arm?
For model number ZBD6880K10SS
Hi Fred,
Thank you for the great question! Once you remove the racks you can turn the lower spray arm counterclockwise while pulling up and it will lift out and then reverse the steps to install the new one.
Hope this helps!
9 people found this helpful.
Was this helpful?
Thank you for voting!
Tony
May 8, 2019
What is the purpose of the two flat metal parts on the lower spray arm?
Hi Tony,
Thank you for your question. The metal pieces on the underside of the lower spray arm are heat protectors. I hope this helps. Thank you and have a great day!
2 people found this helpful.
Was this helpful?
Thank you for voting!
Archana
February 4, 2023
Is there a removable filter that needs cleaning for this type of dishwasher. If yes where is filter and how to clean
For model number GSD6660G10SS
Hello Archana, thank you for your question. Yes, the Filter is PS958919 and we have a video to show you where it is and how to replace it. Hope to hear from you!
Detergent is not desloving. Detergent door opens but detergent is still there, parcially desloved.
For model number GLD4400N00WW
Hi Ralph, thank you for your question. There are a couple of parts that could cause the issue that you are having. I would suggest first check your heating element. If your water is not getting hot enough then your detergent will not dissolve. You may also want to make sure that you dispenser is working as well. If that part is not releasing the detergent at the right time that also may be why it does not dissolve all the way. I hope that helps. Good luck with your repair.
Was this helpful?
Thank you for voting!
Cathy
April 29, 2019
Does lower washer arm part 501 come in a white/cream color?
For model number GHDA480N10WW
Hello Cathy, thank you for your question. Unfortunately, that part does not come in a white/cream color, only gray now. I hope this helps!
Your dishwasher’s middle spray arm is connected to the top dish rack, and moves the water around to clean the dishes. If your dishwasher is noisy, or it is not cleaning the dishes properly, you may need to replace the mi...
This part is the replacement for the middle spray arm in your dishwasher. The middle spray arm is mounted on the bottom of the middle dish rack, and it should rotate and spray water during the operating cycle. If your sp...
Fresh Flow Produce Preserver is made for your refrigerator to help keep produce fresh for longer by absorbing the chemical, ethylene, that causes your fruits and vegetables to ripen quicker. Your produce could be fresh f...
This front load washer cleaner removes odor-causing residue. Use it once a month and it will keep your machine fresh and clean. Package comes with 3 tablets.
This solid element restorer is for ranges and cooktops. Solid element restorer restores and protects solid elements from rusting and spotting. Follow the instructions on the label when using this product.
This low-odor gel, easily cleans away tough burnt-on deposits at room temperature. Apply the gel evenly on the cooled oven surface. Leave the gel to set overnight then wipe away with a clean cloth.
Make your cooktop shine with Frigidaire ReadyClean Glass and Ceramic Cleaner. Our scratch-free, streak-free formula removes smudges, grease, burnt-on food, dirt and oil, while protecting and polishing to repel dust and d...
Model Cross Reference
This part works with the following models:
PartSelect Number: PS1020205
Manufacturer Part Number: WD22X10047