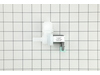
This is a replacement dishrack roller or wheel for your dishwasher. It is made of gray plastic, measures a little over an inch in diameter, and is sold individually. This roller is designed for the lo...
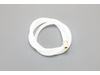
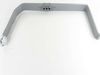
This kit includes 2 spring and 2 cables. This door spring kit is for dishwashers.
Door spring kit applies tension to the dishwasher door through the door hinge to prevent the door from dropping t...
Ask our experts a question about this model and we'll get back to you as soon as possible!
1 question answered by our experts.
< Prev
1
Next >
Sort by:
Search filter:
Clear Filter
Your search term must have 3 or more characters.
Keep searches simple. Use keywords, e.g. "leaking", "pump", "broken" or "fit".
Sorry, we couldn't find any existing answers that matched.Try using some different or simpler keywords, or submit your new question by using the "Ask a Question" button above!
Arnold
February 17, 2022
Machine has developed a leak underneath and have a E15 code displayed.
For model number SHP65T55UC
Hello Arnold, thank you for writing. An E15 error code indicates that the safety switch has detected water in the base of the dishwasher. Your leakage protection system has activated. You have to drain water from the tray by tilting the device and then dry it. We hope this helps.
Was this helpful?
Thank you for voting!
< Prev
1
Next >
✖
Ask a Question
Ask our experts a question on this model and we'll respond as soon as we can.
The E:15 error code means water is detected in the pan under the unit. There are several ways this can happen.
In this case, it was caused by a bad inlet valve. It did not close properly and led to an overflow of water inside that eventually spilled into the pan underneath the unit.
I see now why the pump keeps running after this error. In this case, it would have led to a big flood in the kitchen if it did not.
I was actually able to run the unit while broke by manually operating the valve under our sink that provides water to the unit.
Be sure to turn off breaker before servicing. Don't get shocked!
Be sure to turn off water before starting! Or, you'll have a flood.
Anyway, I just pulled the unit out (was secured by 2 screws on the sides). I lifted up the insulation material on the left side to get at the valve. Pushed a little green tab to release the electrical plug. Then, use pliers to move clamp off the white water hose on the inside. Then, pull of white hose. This was hard in my case. Took a lot of force. Then, reach behind the unit and use pliers to unscrew water hose. Now, the whole gray panel there can pop out with some force. Then, slip the old valve out and slip new one in. Reconnect hoses and clamp. Note that I put some caulk on the connector where white hose goes. Not sure if needed or not.
I removed the 3 #20 torn screws in the handle, and the six #20 tore screws inside the door that hold the outer door skin in place.
The plastic handle has a series of molded hooks that allow it to snap into the stainless steel skin.
To avoid damaging the skin, use a utility knife to cut behind the two large hooks on the bottom of the handle and the one on each end. One trimmed, the handle easily slides out of the door skin.
The new one will effortlessly snap in-place, then reposition the door skin and fasten with the 9 screw previously removed.