


Models
>
LDG4313ST
LDG4313ST ((00)) LG Range - Overview
Sections of the LDG4313ST
[Viewing 7 of 7] LG Range")
 LG Range")
 LG Range")
 LG Range")
 LG Range")
 LG Range")
 LG Range")
Keep searches simple, eg. "belt" or "pump".


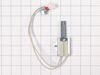
TRANSFORMER ASSEMBLY,POWER
PartSelect #: PS16732632
Manufacturer #: EBJ64465501
The spark module controls the spark for lighting the cooktop surface burners.
$71.70
In Stock


Questions And Answers for LDG4313ST
We're sorry, but our Q&A experts are temporarily unavailable.
Please check back later if you still haven't found the answer you need.
- < Prev
- 1
- Next >
Sort by:
Search filter:
Clear Filter
Your search term must have 3 or more characters.
Keep searches simple. Use keywords, e.g. "leaking", "pump", "broken" or "fit".
Sorry, we couldn't find any existing answers that matched.Try using some different or simpler keywords, or submit your new question by using the "Ask a Question" button above!
Stephen
December 26, 2023
Oven lights will not turn off
For model number LDG4313ST

Hi Stephen, thank you for the question. Based on our research, the issue is most probably with the light switch. We would recommend replacing the light switch, part number PS11710384, to solve the problem. It turns the oven light on and off when the door opens or closes. Glad to be of help!
Was this helpful?
Thank you for voting!
Related Parts:
SWITCH,TACT

$57.47
Special Order
- < Prev
- 1
- Next >
Common Symptoms of the LDG4313ST
[Viewing 6 of 6]Little to no heat when baking
Fixed by
these parts
these parts

Show All
Oven not heating evenly
Fixed by
these parts
these parts
Show All
Element will not heat
Fixed by
these parts
these parts
Show All
Gas igniter glows, but will not light
Fixed by
these parts
these parts
Show All
Oven is too hot
Fixed by
these parts
these parts
Show All
Will Not Start
Fixed by
these parts
these parts
Show All
Keep searches simple. Use keywords, e.g. "leaking", "pump", "broken" or "fit".
Oven wouldn't ignite
Took off the oven door then took out the racks and two screws in the oven bottom and removed it . Then removed the heat deflector. Then un plugged the old igniter and removed the burner to make it easier to remove the old igniter. Then installed the new igniter and reversed the process
Parts Used:
-
Martin from KEWASKUM, WI
-
Difficulty Level:Easy
-
Total Repair Time:15 - 30 mins
-
Tools:Nutdriver
6 of 8 people
found this instruction helpful.
Was this instruction helpful to you?
Thank you for voting!
Oven would not light
As soon as my husband put it in the oven, the very thin prongs broke. There was no guard on either side of the prongs for protection like the one that had been in there. Very costly to us of $185 with no fix. Very disappointed in that ignitor. It would have been an easy fix. Had replaced one previously but it only lasted 6 months. Now we have a new stove
Parts Used:
-
Sheila from HOPKINTON, MA
-
Difficulty Level:Very Easy
-
Total Repair Time:30 - 60 mins
6 of 10 people
found this instruction helpful.
Was this instruction helpful to you?
Thank you for voting!
glass broken lower oven
remove door from oven.
removed screws slipped new window glass. in
very easy
removed screws slipped new window glass. in
very easy
Parts Used:

-
linda from LAKEWAY, TX
-
Difficulty Level:Really Easy
-
Total Repair Time:1- 2 hours
-
Tools:Screw drivers, Socket set
2 of 3 people
found this instruction helpful.
Was this instruction helpful to you?
Thank you for voting!