


Models
>
KERS807SSS03
KERS807SSS03 KitchenAid Range - Overview
Sections of the KERS807SSS03
[Viewing 8 of 8]


Manuals & Care Guides for KERS807SSS03
Click to downloadInstall
Installation Instructions
(1.41MB)
Install
Installation Instructions
(2.22MB)
Manual
Owner's Manuals
(4.09MB)
Keep searches simple, eg. "belt" or "pump".

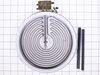
Dual Surface Element - 2500w/1200w
PartSelect #: PS11764902
Manufacturer #: W10823692
This is the replacement large surface element for your cooktop or range. It is approximately 10-inches in diameter and is 1200/2500 watts. The large surface element is installed under the cooktop and ...
$292.17
In Stock
Order within the next 3 hrs and your part ships today!

Touch-Up Paint - White
PartSelect #: PS385132
Manufacturer #: 72017
This 18 ml bottle of white appliance touch-up paint is used to cover scratches or marks on your appliance. The white touch-up paint can be used on refrigerators, microwaves, ranges, clothes dryers, an...
$10.18
In Stock
Order within the next 3 hrs and your part ships today!

Element, Broil
PartSelect #: PS11747304
Manufacturer #: WP9760774
This broil element is found on the roof of the oven. The broil element is at the top of the oven and supplies the heat to broiling. 14" x 15" with 1-3/8" inserts.
This part works with the following...
$243.91
In Stock
Order within the next 3 hrs and your part ships today!

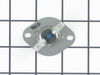
Range High-Limit Thermostat
PartSelect #: PS11747248
Manufacturer #: WP9759242
Also known as Thermal cut-off (fuse). This part establishes and maintains the internal temperature of the oven cavity.
$160.32
In Stock
Order within the next 3 hrs and your part ships today!

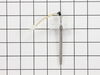
Temperature Probe
PartSelect #: PS11747165
Manufacturer #: WP9755542
Also known as a meat probe.
$118.01
In Stock
Order within the next 3 hrs and your part ships today!

Temperature Sensor
PartSelect #: PS11748765
Manufacturer #: WPW10131825
This temperature sensor detects the temperature within the oven cavity.
$114.37
In Stock
Order within the next 3 hrs and your part ships today!

Light Bulb - 120-130V - 15W
PartSelect #: PS11742328
Manufacturer #: WP4173175
Sold individually.
$60.51
In Stock
Order within the next 3 hrs and your part ships today!

Oven Rack
PartSelect #: PS11749669
Manufacturer #: WPW10179152
This oven rack is chrome in color and is approximately 24.76 inches wide by 15.78 inches deep. If your old oven rack is damaged, you should consider replacing it. Many of our customers have determined...
$107.89
In Stock
Order within the next 3 hrs and your part ships today!

Burner Knob - White/Gray
PartSelect #: PS11749973
Manufacturer #: WPW10193253
Sold individually.
$27.93
In Stock
Order within the next 3 hrs and your part ships today!

Burner Element - Right Front
PartSelect #: PS11764908
Manufacturer #: W10823698
This surface element is for ranges.
The surface element supplies the heat to a cooking area on top of the range.
Unplug the range or shut off the house circuit breaker for the range before insta...
$279.63
In Stock
Order within the next 3 hrs and your part ships today!

Screw
PartSelect #: PS12349731
Manufacturer #: W11233072
This is a multi-use and multi-appliance screw. It can be used on a microwave, refrigerator, range/oven, air conditioner, dehumidifier, washer, or dryer. The measurements of this screw are 8 x 1/2 inch...
$26.43
In Stock
Order within the next 3 hrs and your part ships today!

Range Surface Element Control Switch
PartSelect #: PS11747407
Manufacturer #: WP9763762
This surface element control switch is for ranges.
Surface element control switch turns the surface element on and off and controls how much heat the element produces.
Unplug the range or shut o...
$245.85
In Stock
Order within the next 3 hrs and your part ships today!
Questions And Answers for KERS807SSS03
We're sorry, but our Q&A experts are temporarily unavailable.
Please check back later if you still haven't found the answer you need.
- < Prev
- 1
- Next >
Sort by:
Search filter:
Clear Filter
Your search term must have 3 or more characters.
Keep searches simple. Use keywords, e.g. "leaking", "pump", "broken" or "fit".
Sorry, we couldn't find any existing answers that matched.Try using some different or simpler keywords, or submit your new question by using the "Ask a Question" button above!
Maureen
December 1, 2019
The err message reads replace oven ui. What is the correct part number for this?
For model number KERS807SSS03

Hello Maureen and thanks for writing.
1. Disconnect power for at least 30 seconds.
2. Re-apply power and observe for at least one minute.
3. If code re-appears, replace the control board (also called ERC or clock). Part Number: PS11749720 is in the list of compatible items for your model. We hope this helps. Please contact us anytime.
1 person found this helpful.
Was this helpful?
Thank you for voting!
Related Parts:
Electronic Control Board


$747.11
In Stock
Carolyn
April 16, 2023
How do you remove the warming drawer?
For model number KERS807SSS03
Hello Carolyn, thank you for reaching out. We have researched the model and would recommend following these instructions to remove the warming drawer: First, open the drawer to its fully open position. Locate the black loops on both sides of the drawer. Pull both loops forward at the same time, then pull the drawer out another inch. Holding the drawer by its sides, not its front, gently pull it out. We hope this helps!
Was this helpful?
Thank you for voting!
- < Prev
- 1
- Next >
Common Symptoms of the KERS807SSS03
[Viewing 10 of 10]Element will not heat
Fixed by
these parts
these parts


Show All
Little to no heat when baking
Fixed by
these parts
these parts

Show All
Will Not Start
Fixed by
these parts
these parts

Show All
Little to no heat when broiling
Fixed by
these parts
these parts
Show All
Oven is too hot
Fixed by
these parts
these parts
Show All
Door won’t open after self cleaning cycle
Fixed by
these parts
these parts

Show All
Oven not heating evenly
Fixed by
these parts
these parts
Show All
Door won’t close
Fixed by
these parts
these parts


Show All
Will not program
Fixed by
these parts
these parts

Show All
Touchpad does not respond
Fixed by
these parts
these parts

Show All


Keep searches simple. Use keywords, e.g. "leaking", "pump", "broken" or "fit".
Self Cleaning blows the thermostat fuse
Something Kitchen Aid wont tell you but running a self clean on this model stove blows the fuse located on the back of the stove.
First I slid the stove out and removed the back of the stove held in place by 8 Phillips screws. The thermostat fuse is located near the top middle on the back of the stove. Remove the 2 screws holding it in place. Disconnect the wires, plug in the new part. Put it all back together. Job done in less than 30 minutes.
This repair would have cost $164 through A&E factory service.
Parts Used:
-
Joseph from Worthington, PA
-
Difficulty Level:Really Easy
-
Total Repair Time:15 - 30 mins
-
Tools:Screw drivers
136 of 154 people
found this instruction helpful.
Was this instruction helpful to you?
Thank you for voting!
Radiant element, 2400 watt, under Ceran glass cok top needed replacement.
turned off power
removed ceran top from cabinet
removed element
installed new element
replaced top
powered up and was done
removed ceran top from cabinet
removed element
installed new element
replaced top
powered up and was done
Parts Used:
-
GEORGE from NEWNAN, GA
-
Difficulty Level:Easy
-
Total Repair Time:15 - 30 mins
-
Tools:Pliers, Screw drivers
164 of 249 people
found this instruction helpful.
Was this instruction helpful to you?
Thank you for voting!
Bad Element
Bought new element and installed. Very simple. Used phillips
screw driver.
screw driver.
Parts Used:
-
Michael from Howell, MI
-
Difficulty Level:Easy
-
Total Repair Time:15 - 30 mins
-
Tools:Screw drivers
74 of 120 people
found this instruction helpful.
Was this instruction helpful to you?
Thank you for voting!