This Drip Bowl, also known as a burner bowl or drip pan, is made to fit an element 8 inches in diameter and comes in chrome. The actual total diameter of this drip bowl is closer to 10 inches, but don...
The 8-inch surface element switch is also known as an infinite heat switch, and is a part for your range. It controls the large surface element. It will turn the element on and off, and allow you to c...
This drip bowl, also known as the drip pan or burner bowl, is 6 inches in internal diameter to match the burner, but actually measures closer to 8 inches in total diameter to its outer edges. This au...
This 40-Watt light bulb is sold individually and is a genuine OEM replacement option for your home appliances. It is specially designed to withstand extreme temperatures, so this bulb is compatible wi...
This rear drawer support comes with the installation screw. This part has been redesigned. The new support inserts towards the rear of the drawer as opposed to the side.
This part is also known as the "brains" of the appliance. ***NOTE: The wiring could be different than the original control. This part may need to be installed by an appliance repair person.
This part is the replacement light socket for your oven. The oven light socket provides power to the light, and at the same time holds the light bulb in place.
We're sorry, but our Q&A experts are temporarily unavailable.
Please check back later if you still haven't found the answer you need.
9 questions answered by our experts.
< Prev
1
2
Next >
Sort by:
Search filter:
Clear Filter
Your search term must have 3 or more characters.
Keep searches simple. Use keywords, e.g. "leaking", "pump", "broken" or "fit".
Sorry, we couldn't find any existing answers that matched.Try using some different or simpler keywords, or submit your new question by using the "Ask a Question" button above!
Kathy
December 30, 2019
I need to replace the metal drip pans on my stove. They are impossible to clean!! I have tried everything and nothing works. Are the black or gray porcelain coated drip pans available for this model? It is my understanding that these can be cleaned in the oven when using the self clean cycle. Thank you.
For model number JB250DF1WW
Hi Kathy,
Thank you for your question. The drip pans listed under your model number are chrome. The part number listed under your model number for the 6 inch drip pan is PS244394 and the part number for the 8 inch drip bowl is PS244395. It is best to clean the drip bowls in warm soapy water and wipe them with a cloth. We hope this helps. Thank you and have a great day!
1 person found this helpful.
Was this helpful?
Thank you for voting!
Steve
April 11, 2022
I set my oven at 350 bake and set a oven thermometer in it. The oven beeped saying it was ready but the temperature was only 250. Is it the control panel because I changed out the temperature thermostat
For model number JB250DF1WW
Hello Steve, Thank you for the question. If the Sensor is good, the Control Board PartSelect Number PS8754334 may need to be replaced. If you need help placing an order, customer service is open 7 days a week. Please feel free to give us a call. We look forward to hearing from you!
1 person found this helpful.
Was this helpful?
Thank you for voting!
Richard
November 2, 2023
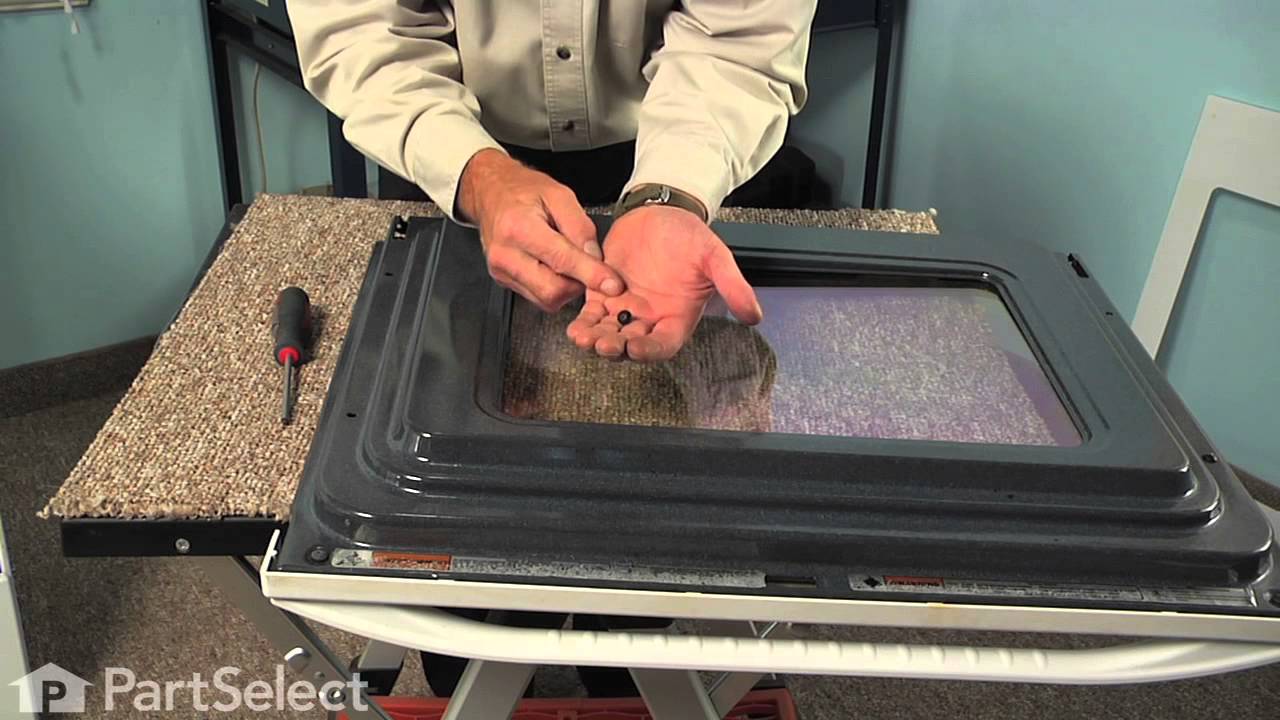
The inner oven door glass shattered. Is it possible to replace it? If so what is the part number and instructions how to replace it.
For model number JB250DF1WW
Hi Richard, Thank you for writing. The Inner Oven Door Glass is sold as a Window Pack Assembly, PartSelect Number PS773379. We were able to locate one of our How to Videos on replacing a Inner Door Glass. The part and appliance might be slightly different; however, they will have the same basic steps for instillation. We hope this helps!
I used the self-clean option, and now it keeps telling me that I need to unlock the door. The door is unlocked. I can't do anything at all
For model number JB250DF1WW
Hello Rachel, Thank you for the question. Here is link on How To Fix An Oven Door That Won't Open After A Self Clean Cycle. We hope this helps.
https://www.partselect.com/Repair/Range-Stove-Oven/Door-Will-Not-Open-After-Self-Clean/
Was this helpful?
Thank you for voting!
Steve
April 11, 2022
Customer bakes bread. Brown on the outside and doughy on the inside?
For model number JB250DF1WW
Hello Steve, Thank you for the question. We suggest testing the Temperature Sensor. Testing the temperature sensor probe on your oven is easy. With the sensor at room temperature, measure the resistance between the two prongs at the end of the sensor connector. The resistance of the sensor should read approximately 1080 – 1090 ohms at room temperature. If you need help placing an order, customer service is open 7 days a week. Please feel free to give us a call. We look forward to hearing from you!
Turned off circuit breaker to range. Removed the 2 oven racks. Removed two screws in back of oven compartment. Pulled element forward and the terminal connections get exposed. The right terminal clip disconnected by itself and the wire went back into the stove and could not be retrieved. Removed range draw under the oven and pulled entire range out from wall about 4 feet.. Removed metal backing with a socket wrench and exposed the oven element wires and terminals. Reinstalled new element and metal backing. Since range was out from wall, cleaned and vacuumed before pushing stove back in place. Since range draw was out re-leveled by setting adjustable feet. Reinstalled drawer and racks. Turned on circuit breaker. Tested element by setting bake cycle on.