


Models
>
DG8600PW1
DG8600PW1 Frigidaire Dryer - Overview
Sections of the DG8600PW1
[Viewing 5 of 5]


Keep searches simple, eg. "belt" or "pump".

Rear Drum Bearing Kit
PartSelect #: PS459829
Manufacturer #: 5303281153
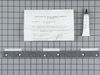
This kit includes one bearing, one ball shaft, one ball bearing, one ball bearing retainer, a small tube of high temperature lubricant, and installation screws.
$79.28
In Stock

Drum Belt
PartSelect #: PS1148434
Manufacturer #: 134503600
This 88 3/4 inches long and 1/4 inch wide dryer drum belt goes around the dryer drum and the pulley to rotate the drum once the motor is activated.
$22.44
In Stock

Upper Drum Glide
PartSelect #: PS470317
Manufacturer #: 5303937139
Front upper felt glide pad with 3 nylon glides - includes adhesive.
$51.09
In Stock

Drum Support Bearing
PartSelect #: PS418807
Manufacturer #: 131825900
This part attaches onto the inside of the rear panel of the cabinet.
$8.04
In Stock

Thermal Limiter - Limit 220
PartSelect #: PS419402
Manufacturer #: 134120900
This thermal fuse limiter, with a limit of 220 degrees Fahrenheit, is manufactured for both gas and electric clothes dryers. Once the internal temperature of the dryer reaches 220 degrees, the heating element cuts out.
$34.56
In Stock

Door Catch
PartSelect #: PS418433
Manufacturer #: 131658800
This part helps keep the door closed while the machine is running.
$79.66
In Stock

Door Strike
PartSelect #: PS455020
Manufacturer #: 5303207102
"Male" piece of a dryer door closing mechanism.
$23.90
In Stock

M Series Ignition Coil Kit
PartSelect #: PS470049
Manufacturer #: 5303931775
This ignition coil kit contains two coils. One is a two wire secondary coil, while the other is a three wire booster coil. Both should be used together in your gas clothes dryer.
$34.74
In Stock

Dryer Drum Bearing Bracket
PartSelect #: PS12579101
Manufacturer #: 131724301
This drum bearing bracket is for dryers. Drum bearing bracket holds and supports the drum bearing
$15.66
In Stock


Front Drum Seal
PartSelect #: PS459776
Manufacturer #: 5303281049
Used with dryers with a 27-inch drum.
$41.58
Special Order

Questions And Answers for DG8600PW1
We're sorry, but our Q&A experts are temporarily unavailable.
Please check back later if you still haven't found the answer you need.
Common Symptoms of the DG8600PW1
[Viewing 6 of 6]Noisy
Fixed by
these parts
these parts


Show All
Marks left on clothes
Fixed by
these parts
these parts
Show All
Door won’t close
Fixed by
these parts
these parts


Show All
Too hot
Fixed by
these parts
these parts

Show All
Drum Not Spinning
Fixed by
these parts
these parts
Show All
Not Heating
Fixed by
these parts
these parts


Show All


Keep searches simple. Use keywords, e.g. "leaking", "pump", "broken" or "fit".
Squealing noise
We followed the instructions for the drum glide replacement and changed the belt and drum support bearing piece, cleaned it out too. Works like a charm. Thanks for saving us a bundle.
Parts Used:
-
Cynthia from Lexington, SC
-
Difficulty Level:Easy
-
Total Repair Time:1- 2 hours
-
Tools:Pliers, Wrench (Adjustable), Wrench set
529 of 551 people
found this instruction helpful.
Was this instruction helpful to you?
Thank you for voting!
Loud Squeaking
1. Unplug dryer from outlet
2. Using Lg. flat screwdriver, pry under the front edge of the top and release two spring tabs
3. Lift up top and tilt back out of your way
4. Unscrew two phillips scews on inside of front panel
5. Lift up and out the front panel. Two spring clips at bottom.
6. Rlease tension on drum belt at the motor. Access panel at rear of dryer.
7.Unscrew 3 screws from inside, center rear of drum.
8. Remove drum through the front of the dryer. You may have to spread the sides apart a little bit for it to fit
9. Lift up on the rear drum bearing to remove it from the bearing retainer. ( U shaped plastic socket)
10. unsrew 2 screws and remove the bearing retainer, ground ball. Ball retainer is on outside of dryer.
11. Vacuum everything--duct, blower, lint trap, ect.
12. Intall new bearing retainer and grounding ball, an assistant is helpful at this time, one to hold ball retainer on rear of dryer, one to screw it in from the inside
13. reassemble remainder of parts in reverse order.
Parts Used:
-
Frank from Boyertown, PA
-
Difficulty Level:Easy
-
Total Repair Time:15 - 30 mins
-
Tools:Nutdriver, Screw drivers
334 of 351 people
found this instruction helpful.
Was this instruction helpful to you?
Thank you for voting!
Thermal Limiter opened
Unplugged Dryer.
Opened top of Dryer, over the drum.
Removed Thermal Limiter.
Tested the Thermal Limiter - found it was open.
Checked all vents and exhaust tube for lint build-up.
Replaced Thermal Limiter.
Closed top of dryer.
Plugged Dryer back.
Tested Dryer - it works.
Opened top of Dryer, over the drum.
Removed Thermal Limiter.
Tested the Thermal Limiter - found it was open.
Checked all vents and exhaust tube for lint build-up.
Replaced Thermal Limiter.
Closed top of dryer.
Plugged Dryer back.
Tested Dryer - it works.
Parts Used:
-
Stephen from Newnan, GA
-
Difficulty Level:A Bit Difficult
-
Total Repair Time:15 - 30 mins
-
Tools:Pliers, Screw drivers
243 of 319 people
found this instruction helpful.
Was this instruction helpful to you?
Thank you for voting!