


Models
>
CGEF3042KFC
CGEF3042KFC Frigidaire Range - Overview
Sections of the CGEF3042KFC
[Viewing 5 of 5]


Manuals & Care Guides for CGEF3042KFC
Click to downloadInstall
Installation Instructions
(2.28MB)
Install
Installation Instructions
(0.38MB)
Manual
Owner's Manuals
(10.78MB)
Manual
Owner's Manuals
(13.40MB)
Wiring
Wiring Diagram
(1.4MB)
Keep searches simple, eg. "belt" or "pump".

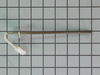
Temperature Sensor
PartSelect #: PS1528542
Manufacturer #: 316490000
This temperature sensor detects the temperature within the oven cavity.
$65.85
In Stock

Light Bulb
PartSelect #: PS12751166
Manufacturer #: 316538904
Clear, 120 Volt, 40 Watt.
$25.08
In Stock

Main Terminal Block Kit
PartSelect #: PS471605
Manufacturer #: 5304409888
Terminal blocks (also called terminal boards or strips) provide a convenient means of connecting individual electrical wires.
$11.93
In Stock

LENS
PartSelect #: PS16218465
Manufacturer #: 5304524341
This lens covers the interior oven light bulb.
$15.66
In Stock

Infinite Burner Switch - Small Element - 240V
PartSelect #: PS1145039
Manufacturer #: 316436000
This switch controls the stove top surface burner.
$89.32
In Stock

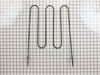
Radiant Element with Limiter - 1200W
PartSelect #: PS1528719
Manufacturer #: 318178110
$216.40
In Stock

ELEMENT
PartSelect #: PS16763418
Manufacturer #: 5304533520
Dual Radiant Surface Element
$96.41
In Stock

Oven Rack
PartSelect #: PS1765356
Manufacturer #: 316496201
This is a replacement rack for your oven. The oven rack fits into grooves on the side of the oven wall, and acts as a shelf that you can place food items on when you want to cook them in the oven. Thi...
$154.66
In Stock

GLASS
PartSelect #: PS11728351
Manufacturer #: 5304503232
This is also called the heat barrier glass.
$194.33
In Stock


Glass
PartSelect #: PS12175974
Manufacturer #: 316452758
This oven door outer panel is for ranges Oven door outer panel covers the outermost part of the oven door. Wait until the surface is cool to the touch before starting the repair. Wear work gloves to p...
$410.25
In Stock

Oven Rack Link
PartSelect #: PS2364129
Manufacturer #: 316546300
This part is a single oven rack link arm. It is a genuine OEM replacement part for your oven. It connects the oven rack to the door bracket, to allow the rack to extend out when you open the oven door...
$30.62
In Stock
Questions And Answers for CGEF3042KFC
We're sorry, but our Q&A experts are temporarily unavailable.
Please check back later if you still haven't found the answer you need.
- < Prev
- 1
- Next >
Sort by:
Search filter:
Clear Filter
Your search term must have 3 or more characters.
Keep searches simple. Use keywords, e.g. "leaking", "pump", "broken" or "fit".
Sorry, we couldn't find any existing answers that matched.Try using some different or simpler keywords, or submit your new question by using the "Ask a Question" button above!
Lucie
September 14, 2022
I bought a all American pressure cooker 915 wondering if I could use it on my stove
For model number CGEF3042KFC

Hi Lucie,
Thank you for your question. Yes, this pressure cooker can be used on a flattop stove. Use caution when using it and do not let it drop or you will damage cooktop. If you have any questions, please let us know. We are open 7 days a week. We look forward to hearing from you!
1 person found this helpful.
Was this helpful?
Thank you for voting!
- < Prev
- 1
- Next >
Common Symptoms of the CGEF3042KFC
[Viewing 9 of 9]Element will not heat
Fixed by
these parts
these parts


Show All
Little to no heat when baking
Fixed by
these parts
these parts


Show All
Oven is too hot
Fixed by
these parts
these parts
Show All
Will Not Start
Fixed by
these parts
these parts
Show All
Oven not heating evenly
Fixed by
these parts
these parts
Show All
Door won’t close
Fixed by
these parts
these parts


Show All
Little to no heat when broiling
Fixed by
these parts
these parts
Show All
Door won’t open after self cleaning cycle
Fixed by
these parts
these parts

Show All
Gas igniter glows, but will not light
Fixed by
these parts
these parts
Show All


Keep searches simple. Use keywords, e.g. "leaking", "pump", "broken" or "fit".
Cord was not tightened enough by delivery crew.
PF alarm appeared on display. Noticed clicking when cord was moved. Had arced for some time and melted original block. New part slightly different. Only has 3 lugs, old one had six. Stack using washers provided. Take note of colors before disassembly. Use caution while working through access opening. The edges are sharp. Only tools needed are phillips screwdriver, deep socket for lug nuts. Nut driver optional. Hope this is helpful.
Parts Used:
-
Timothy from Spring Valley, AL
-
Difficulty Level:Really Easy
-
Total Repair Time:15 - 30 mins
-
Tools:Screw drivers, Socket set
98 of 155 people
found this instruction helpful.
Was this instruction helpful to you?
Thank you for voting!
burned out burner
First we removed two screws under the rim of the range top to open the lid. Lifted the lid and removed the screws from the bracket that holds the elements, Be careful with the clips that hold the element in, if you break them or bend them there aren't any more! Also note which holes they were in, they are marked according to the different sizes of elements. Disconnected the wires, needed needlenose pliers to grip them...connected new element, popped it back in place, replaced bracket, closed top ...Easy peasy!!!
Parts Used:
-
Lori from Winter Haven, FL
-
Difficulty Level:Easy
-
Total Repair Time:Less than 15 mins
-
Tools:Pliers, Screw drivers
67 of 87 people
found this instruction helpful.
Was this instruction helpful to you?
Thank you for voting!
Cracked oven door inner glass
Repair was quite easy, as long as you have the instructions for removing the door. The screws that hold the bottom of the door to the fixed hinge are placed into the side of the hinge assembly after removal; this holds the door at a 45 degree angle for easy removal. After that, just place the door on a flat surface and dismantle the door from the inside. The inner glass is contained in a metal frame with another piece of glass; this frame comes apart easily using the clips in each side. The door assembles easily after the glass is replaced; just take your time and give yourself enough room to lay out the parts as you go. Good luck!
Parts Used:
-
Mitch from Fernandina Beach, FL
-
Difficulty Level:Easy
-
Total Repair Time:15 - 30 mins
-
Tools:Screw drivers
74 of 112 people
found this instruction helpful.
Was this instruction helpful to you?
Thank you for voting!