


Models
>
AGDS902SS
AGDS902SS (P1131833NSS) Amana Range - Overview
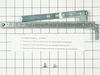
Sections of the AGDS902SS
[Viewing 8 of 8]


.gif "MISCELLAEOUS INFORMATION Diagram and Parts List for P1131833NSS Amana Range")


Keep searches simple, eg. "belt" or "pump".

Flat Style Oven Igniter
PartSelect #: PS387058
Manufacturer #: 786324
You must reuse the original bracket. Be very careful to not touch the black element part of this igniter as it is very fragile.
$74.24
In Stock

Spark Ignition Electrode
PartSelect #: PS11757464
Manufacturer #: WPY0316773
This spark ignition electrode is just over an inch in length. It comes with a mounting bracket and is used for some gas ranges and ovens.
$60.00
In Stock

2 Piece Broiler Pan
PartSelect #: PS971245
Manufacturer #: 4396923
The top of this part is now black.
$47.67
In Stock

Wire Oven Rack
PartSelect #: PS11740769
Manufacturer #: WP314763J
This wire oven rack is used on some ovens and ranges. It is twenty-three inches long and it is made of metal.
$51.95
In Stock

Oven Light
PartSelect #: PS11744440
Manufacturer #: WP74011278
This oven light assembly is a little over four inches long. It is a six hundred an sixty watt light bulb.
$103.44
In Stock

Set Button Knob
PartSelect #: PS2030441
Manufacturer #: 308957B
This set button knob is sold individually. It is all black in color and is made entirely of plastic.
No Longer Available

Installation Screw
PartSelect #: PS11741612
Manufacturer #: WP3400882
This screw is sold individually.
$10.23
In Stock

Stand Mixer Screw
PartSelect #: PS11742292
Manufacturer #: WP4159193
This screw is sold individually.
$10.98
In Stock

Grease Filter
PartSelect #: PS11757449
Manufacturer #: WPY0307363
This aluminum grease filter is eighteen inches long and four inches wide.
$29.39
Special Order

Surface Burner Head
PartSelect #: PS11744559
Manufacturer #: WP7504P109-60
Sold individually.
No Longer Available


Questions And Answers for AGDS902SS
We're sorry, but our Q&A experts are temporarily unavailable.
Please check back later if you still haven't found the answer you need.
Common Symptoms of the AGDS902SS
[Viewing 6 of 6]Gas igniter glows, but will not light
Fixed by
these parts
these parts


Show All
Will Not Start
Fixed by
these parts
these parts
Show All
Little to no heat when baking
Fixed by
these parts
these parts

Show All
Element will not heat
Fixed by
these parts
these parts
Show All
Door won’t close
Fixed by
these parts
these parts

Show All
Little to no heat when broiling
Fixed by
these parts
these parts
Show All

Keep searches simple. Use keywords, e.g. "leaking", "pump", "broken" or "fit".
Oven wouldn't heat. Glow ignitor was weak and wouldn't ignite flame.
After shutting off the gas and removing the oven door, which simply slid off of the hinges, I removed the oven plate. The ignitor was attached to the manifold. I removed that and noted the wires were attached back behind a hole in the back of the oven. I thought I would have to access them from the back but when I pulled on them I was able to reach them from the front. I was surprised to find plastic lugs covering the wire ends, rather than ceramic. I attached the new ignitor wires and reused the plastic lugs, as no ceramic ones came with the new ignitor. I carefully slid the new ignitor back into the cage/shield attached to the manifold and replaced the manifold. I then turned the gas back on and tested the ignitor (which worked perfectly) before replacing the oven plate. The repair took less than 30 minutes, but my wife and I thoroughly cleaned the door and interior while we had it apart. The hardest part was getting the door back on the hinges, but this too was accomplished after several attempts. The oven heats up beautifully now.
Parts Used:

-
John from Niles, MI
-
Difficulty Level:Easy
-
Total Repair Time:15 - 30 mins
-
Tools:Screw drivers
91 of 100 people
found this instruction helpful.
Was this instruction helpful to you?
Thank you for voting!
Broken Electrode, no spark
Remove 2 screws holding the top burner. Remove 1 screw holding the electrode. Remove electrode from wiring using plier. Install new electrode and top burner
Parts Used:

-
HUY from ALISO VIEJO, CA
-
Difficulty Level:Easy
-
Total Repair Time:Less than 15 mins
-
Tools:Pliers, Screw drivers
51 of 61 people
found this instruction helpful.
Was this instruction helpful to you?
Thank you for voting!
Burner would not ignite when control in "light" position
Remove the two screws from the burner assembly (on top of the burner). Lift burner assembly from the cook top. Disconnect the electrode wire from the electrode. Remove the screw holding the electrode to the burner assembly (on bottom of burner). Install the new electrode and attach the electrode to the burner assembly. Attach the electrode wire to the electrode. drop the burner assembly back into position on the cooktop. Attach the burner assembly using two screws.
Parts Used:
-
Michael from Friendswood, TX
-
Difficulty Level:Really Easy
-
Total Repair Time:Less than 15 mins
-
Tools:Screw drivers
22 of 27 people
found this instruction helpful.
Was this instruction helpful to you?
Thank you for voting!