


Models
>
72042
72042 (ASWCSE2) LG Refrigerator - Overview
Sections of the 72042
[Viewing 7 of 7]
Exact Part matches for your search term
[Viewing 1 of 1]
SVC-FAN DRYING
This part number matches the current model number 72042
PartSelect #: PS17504911
Manufacturer #: DD81-03988A
No Longer Available
Keep searches simple, eg. "belt" or "pump".

DOOR BASKET ASSEMBLY
PartSelect #: PS3637058
Manufacturer #: AAP73252202
Refrigerator door bin AAP73252202 is an original equipment manufacturer (OEM) part that fits some Kenmore Elite bottom-freezer refrigerators in the following series: 7957204, 7957205, 7957209, 7957218...
$95.97
In Stock

Handle Screw
PartSelect #: PS8752913
Manufacturer #: MJB63190001
This handle screw, also known as a mounting bolt, is a mounting screw to help secure the door handle to your refrigerator door. If your handle is loose, you may just need to tighten the screw. If your...
$11.88
In Stock


Primary Water Valve - Single Coil
PartSelect #: PS3536019
Manufacturer #: MJX41178908
$82.74
In Stock

Refrigerator Compressor Overload Protector
PartSelect #: PS3603394
Manufacturer #: 6750CL0001D
The compressor overload protector attaches to the compressor and shuts off the compressor if the compressor motor draws too much current.
$45.74
In Stock


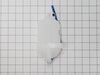
Refrigerator Water Reservoir
PartSelect #: PS3618757
Manufacturer #: AJL72911502
The water reservoir holds the water for the water dispenser as the water chills.
$82.67
In Stock

GASKET,DOOR
PartSelect #: PS11758511
Manufacturer #: MDS38201426
Freezer door gasket is on the inner door panel and creates a seal around the door to prevent warm air from entering the freezer compartment.
$87.01
In Stock


Questions And Answers for 72042
We're sorry, but our Q&A experts are temporarily unavailable.
Please check back later if you still haven't found the answer you need.
Common Symptoms of the 72042
[Viewing 8 of 8]Leaking
Fixed by
these parts
these parts


Show All
Not dispensing water
Fixed by
these parts
these parts
Show All
Noisy
Fixed by
these parts
these parts

Show All
Door won’t open or close
Fixed by
these parts
these parts

Show All
Fridge too warm
Fixed by
these parts
these parts
Show All
Ice maker won’t dispense ice
Fixed by
these parts
these parts

Show All
Frost buildup
Fixed by
these parts
these parts

Show All
Fridge and Freezer are too warm
Fixed by
these parts
these parts

Show All

Keep searches simple. Use keywords, e.g. "leaking", "pump", "broken" or "fit".
Our refrigerator was not dispencing water or ice.
Turned of water to refrigerator and unplugged refrigerator. Removed the water line from refrigerator. Removed back panel. Removed mounting screw from the water valve, Unhooked wire harness from valve and removed the water line on back of valve. Reconnected wiring harness to new valve, reconnected water line on back of valve. Replaced the back panel to refrigerator and put the water line back on the new valve. Turned on water valve and checked for leaks. It's now dispensing water and ice.
Parts Used:
-
Nancy from NEW ALBANY, IN
-
Difficulty Level:Very Easy
-
Total Repair Time:Less than 15 mins
-
Tools:Pliers, Screw drivers, Wrench (Adjustable)
10 of 18 people
found this instruction helpful.
Was this instruction helpful to you?
Thank you for voting!
Ice chute would not open.
Removed ice dispenser and display with small screwdriver from front of the fridge. Pried out the whole piece slowly. This exposed the motor that activates the chute. Plugged in the new motor before any removal to verify the motor was the problem. When it worked, removed old and installed new. 3 screws. Piece of cake.
Parts Used:

-
Steve from MUKWONAGO, WI
-
Difficulty Level:Easy
-
Total Repair Time:30 - 60 mins
-
Tools:Screw drivers
13 of 30 people
found this instruction helpful.
Was this instruction helpful to you?
Thank you for voting!
Water inlet valve was leaking
0) Look on the internet for a DIY/or pro-shop Video
1) Pull the refrigerator away from the wall, unplug the power cable
2) Shut off the water at the wall valve
3) Disconnect the water line at the inlet valve on the refrigerator (lower corner, right side), this is a threaded pipe fitting requiring a small open end wrench
4) Remove the lower rear panel
5) Remove the water inlet and distribution valve assembly, there is one sheet-metal screw holding the assembly to the back edge of the refrigerator.
6) Carefully pull the assembly out of the back of the refrigerator, leave the distribution water lines attached, note the orientation
7) Disconnect the electrical connectors, note the orientation/types
8) Disconnect the water line from the inlet valve, remove the retaining clip, then pull out the line. Note - a small metal star shaped tube fitting may come out with the valve, this is fine and will not be used again.
9) Remove the inlet valve from the assembly (there are two small sheet-metal screws that are very tight, the correct/precise size, good quality Philips head screw driver is necessary or use a small set of vice-grips to grab the head of the screw)
10) Attach the new valve to the valve assembly, connect the electrical connectors, note - at the plastic refrigerator water line that connects to the inlet valve, trim/cut a small section off the end of the water line before connecting it to the valve. This will provide a fresh interface for the connection. Push the line in firmly and then install the retaining clip.
11) Perform a quick functional check before putting everything back together - Attach the water line from the wall, turn on the water, attach the electrical connectors, plug in the refrigerator power cable and test for operation and leaks.
12) Assuming no leaks/operational issues, unplug the refrigerator power cable again, turn off the water at the wall, disconnect the water line at the inlet valve and reinstall the valve assembly and rear panel. Reconnect the water line and plug in the power cable and you should be good to go.!
Parts Used:
-
JONATHAN from ROSWELL, GA
-
Difficulty Level:A Bit Difficult
-
Total Repair Time:30 - 60 mins
-
Tools:Screw drivers, Wrench set
4 of 5 people
found this instruction helpful.
Was this instruction helpful to you?
Thank you for voting!