


Models
>
36358042891
36358042891 Kenmore Refrigerator - Overview
Sections of the 36358042891
[Viewing 8 of 8]
Keep searches simple, eg. "belt" or "pump".

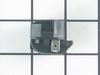
Door Closing Cam
PartSelect #: PS297995
Manufacturer #: WR2X4901
This single door closure cam is mounted on the door, not the hinge.
$28.96
Special Order

Evaporator/Condensor Fan Grommet
PartSelect #: PS284555
Manufacturer #: WR02X10098
This evaporator fan motor grommet, or condenser fan grommet is built for refrigerators. It provides a cushion between the fan motor and the motor mounting bracket. It is made or round, black plastic a...
$14.73
Special Order

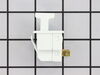
Bottom Hinge Assembly
PartSelect #: PS290199
Manufacturer #: WR13X10020
Comes with both cam risers. This hinge kit is suitable for the bottom of either the freezer door or the refrigerator door of some refrigerators.
$74.45
Special Order

Light Bulb - 40W
PartSelect #: PS217532
Manufacturer #: 40A15
This 40-Watt light bulb is sold individually and is a genuine OEM replacement option for your home appliances. It is specially designed to withstand extreme temperatures, so this bulb is compatible wi...
$5.85
Special Order


Ice Maker
PartSelect #: PS1993870
Manufacturer #: WR30X10093
Replacement icemaker kit - electronic. This kit includes a 4 pin round plug-in connector, 6 post plug-in connector, tube and fill cup.
$274.85
Special Order

Defrost Timer
PartSelect #: PS310858
Manufacturer #: WR9X489
This device acts like a clock. It continually advances and alternates between activating the cooling cycle and the defrost heater.
$80.05
Special Order

Drawer Slide Rail - Left Side
PartSelect #: PS306735
Manufacturer #: WR72X10010
This part is the replacement drawer slide rail for your refrigerator. It is made of white plastic and is approximately 16 inches long and 1.5 inches wide. The crisper draw will slide in and out along ...
No Longer Available

Defrost Heater with Thermostat
PartSelect #: PS303933
Manufacturer #: WR51X442
This part assembly has 2 functions: The defrost heater keeps the cooling coils from frosting over and the thermostat senses that the heat near the cooling coils has reached the desired temperature. Us...
$161.31
Special Order

Single Outlet Valve Kit
PartSelect #: PS304375
Manufacturer #: WR57X10033
This single outlet valve has 1/4 inch compression fittings, and is intended for use with refrigerators that have ice makers that make crescent shaped ice cubes.
NOTE: As per the manufacturer this v...
$86.06
Special Order

Drawer Slide Rail - Right Side
PartSelect #: PS306734
Manufacturer #: WR72X10009
This drawer track supports the right hand side of the sliding drawer.
$44.26
Special Order

Lower Drawer Slide Rail - Left Side
PartSelect #: PS306733
Manufacturer #: WR72X10008
No Longer Available
Questions And Answers for 36358042891
We're sorry, but our Q&A experts are temporarily unavailable.
Please check back later if you still haven't found the answer you need.
Common Symptoms of the 36358042891
[Viewing 20 of 20]Ice maker not making ice
Fixed by
these parts
these parts


Show All
Fridge too warm
Fixed by
these parts
these parts


Show All
Door won’t open or close
Fixed by
these parts
these parts


Show All
Light not working
Fixed by
these parts
these parts
Show All
Leaking
Fixed by
these parts
these parts

Show All
Noisy
Fixed by
these parts
these parts


Show All
Freezer section too warm
Fixed by
these parts
these parts
Show All
Freezer not defrosting
Fixed by
these parts
these parts
Show All
Ice maker won’t dispense ice
Fixed by
these parts
these parts
Show All
Door Sweating
Fixed by
these parts
these parts
Show All
Fridge runs too long
Fixed by
these parts
these parts
Show All
Will Not Start
Fixed by
these parts
these parts

Show All
Frost buildup
Fixed by
these parts
these parts
Show All
Clicking sound
Fixed by
these parts
these parts
Show All
Freezer too cold
Fixed by
these parts
these parts
Show All
Fridge and Freezer are too warm
Fixed by
these parts
these parts
Show All
Ice maker dispenses too little ice
Fixed by
these parts
these parts
Show All
Not dispensing water
Fixed by
these parts
these parts
Show All
Ice maker dispenses too much ice
Fixed by
these parts
these parts
Show All
Won’t start
Fixed by
these parts
these parts
Show All


Keep searches simple. Use keywords, e.g. "leaking", "pump", "broken" or "fit".
Door would not automatically close.
Symptom: Door did not close automatically. Also had found small chunks of black plastic on the floor. Refrigerator door was slightly lower than the freezer door.
One false start because I did not realize both of the door-closing cams had disintegrated and I had only ordered the cam without the hinge.
Purchased part 290199 Hinge Assembly. It came with matching door-closing cam. (Had not known so I also purchased the cam 297995 separately). Next time I will know to only purchase the Hinge Assembly.
Replacement procedure took about 20 minutes including removing and replacing door shelves and their contents. Two people involved.
1. Remove all door shelves with contents and other contents on door.
2. Remove the top Phillips head screw holding the decorative plastic on the top.
3. Remove the two top hinge screws on top of refrigerator using metric #8 socket wrench. Second person made sure door did not fall off.
4. Lift the door off the bottom hinge pin. Second person holds door on it’s side.
5. Take off the bottom refrigerator cover
6. Remove the bottom hinge assembly screws using metric #8 socket wrench.
7. Mount the replacement bottom hinge assembly and tighten the two screws.
8. On the door bottom, remove the outer screw and loosen the inner screw using metric #8 socket wrench.
9. Replace the door-closing cam (or what is left of it) with the cam in line with the door and cam bumps away from the door.
10. Place the door back on the hinge pin (one person holds while the other person maneuvers the door bottom).
11. Replace the top hinge and reinsert the screws on top of the refrigerator. Dress the door so that it does not press hard on the rubber door gaskets (or the door will fail to shut automatically). Tighten the screws.
12. Replace the decorative plastic over the top hinge.
13. Open the door and replace the bottom refrigerator cover.
14. Replace the door shelves and all contents.
15 Close the door.
Parts Used:
-
Gary from North eastham, AL
-
Difficulty Level:Really Easy
-
Total Repair Time:15 - 30 mins
-
Tools:Screw drivers, Socket set
177 of 191 people
found this instruction helpful.
Was this instruction helpful to you?
Thank you for voting!
Defroster failure
Fridge was not really cold. Fan was working at back of freezer. Romoved the drawers and back panel of freezer compartment. Melted ice with a blow dryer and collected water with a towel so that it would not overflow the drip pan. Installed the new defroster units with 4 screws and the easy plug in wiring harness. Bingo! Defrost timer was probably OK but new one is easy to do.
Fixed in one day vs waiting for service call & payng $$$.
Fixed in one day vs waiting for service call & payng $$$.
Parts Used:
-
Joseph from North Attleboro, MA
-
Difficulty Level:Really Easy
-
Total Repair Time:15 - 30 mins
-
Tools:Nutdriver, Screw drivers
128 of 145 people
found this instruction helpful.
Was this instruction helpful to you?
Thank you for voting!
Refrigerator temp was warm
Per the trouble shooting guide on the home page of the website. I suspected the defrost timer was bad because ice had heavily accumulated on the back wall of the freezer compartment and the temperature inside the refrigerator was warm. First, I removed all the freezer racks. Then removed the (4) screws on the back wall in the freezer compartment. I then removed the ben from the ice maker to allow more room. Once I saw all the ice, I unplugged the refrigerator, and used a hair dryer to defrost ( it took about an hour to get it all). Once the ice was all gone, I then moved into the refrigerator compartment and removed the top shelve. This allowed me more room and access to the defrost timer which was behind the back panel. I used the trouble shooting guide to test the old timer prior to removing the new one from the package, (just in case I needed to send it back). Through this test I determined that the timer was bad, it wasn't the heating element or the t-stat. It was very easy to access, I removed the two knobs and lifted up the panel. I located the defrost timer and removed the screws as directed. I replaced the timer just as I had removed it, plugging in the electrical terminals per the removal process. I then reversed the order and put the panel and top shelve back on. Once all complete, I then moved back into the freezer compartment and replace the back panel and then the ice ben. I plugged it in and haven't had a problem since. This site has saved me a tremendous amount of money, a service contractor quoted us $300, to determine the problem. I ordered the part and it was sitting on our door stoop the next morning.
Parts Used:
-
Adrian from Louisville, KY
-
Difficulty Level:Really Easy
-
Total Repair Time:1- 2 hours
-
Tools:Nutdriver
126 of 145 people
found this instruction helpful.
Was this instruction helpful to you?
Thank you for voting!