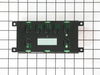
This is the electronic clock timer mechanism only. The overlay or touch pad is NOT included. To get the overlay, please use the model# of your appliance to search.
$219.75
In Stock
Order within the next 8 hrs and your part ships today!
Dual Element with Limiter -9 Inch /6 Inch - 1300W 1200W.
With this element, you can adjust the size of the burner you want to use to match your pots/pans.
$258.02
In Stock
Order within the next 8 hrs and your part ships today!
This part is the heatsource. This surface element is for ranges.
Surface element supplies the heat to a cooking area on top of the range.
Unplug the range or shut off the house circuit breaker ...
$249.54
In Stock
Order within the next 8 hrs and your part ships today!
Order within the next 8 hrs and your part ships today!
Questions And Answers for FFEF3043LSK
Ask our experts a question about this model and we'll get back to you as soon as possible!
7 questions answered by our experts.
< Prev
1
2
Next >
Sort by:
Search filter:
Clear Filter
Your search term must have 3 or more characters.
Keep searches simple. Use keywords, e.g. "leaking", "pump", "broken" or "fit".
Sorry, we couldn't find any existing answers that matched.Try using some different or simpler keywords, or submit your new question by using the "Ask a Question" button above!
Kristopher
February 10, 2020
The top range well heat up but broil and bake well not get hot at all
For model number FFEF3043LSK
Hello Kristopher, thank you for your question. If both the elements quit working at the same time and the stove top still works, then you may have to replace the control board. When the control board goes bad, it can still function partially (clock works, buttons work, ect) but not send power to the elements. If you want to verify that the control board is bad, then you would need to do a voltage test at the element. The bake and broil elements should both see 240 volts from the control board to function properly. If you do not see any voltage, then the control board will need to be replaced.
The display on my stove gave me an error code of F 11 and started low beeping then switched to high beeping. It stopped for a few minutes then started again doing the same pattern of beeping. I unplugged it for a few minutes and then plugged it back in which made the code go away. Can you explain what caused this and what would i need to replace to prevent the stove from being unusable?
For model number FFEF3043LSK
Hello Anthony, thank you for reaching out. We have researched and found that the error code F11 indicates a shorted key error. We would recommend checking the control board, part number PS12728848, to fix the issue. We hope this helps!
I want to change the oven light that burnt out. What is the procedure
For model number FFEF3043LSK
Hello Gary, Thank you for the question. You will need to first turn off power to the appliance but unplugging it from the outlet or switching off at the breaker. With a work glove, grasp the bulb and turn to the left to loosen and remove the bulb. Insert the new bulb and turn right to tighten the new bulb. Careful not to over tighten and break the bulb. Turn the power back onto the appliance and test to see if the light works. We hope this helps.
Was this helpful?
Thank you for voting!
Sharon
December 27, 2023
Oven does not heat.
For model number FFEF3043LSK
Hello Sharon, thank you for the question. Based on our understanding of the issue, we would suggest you checking the temperature sensor, part number PS11731754. The resistance of the sensor should read approximately 1080–1090 ohms at room temperature. We hope this solves your problem!
We moved into our townhouse about 6 yrs ago. During the home inspection we checked the range and saw the Red light come on when we turned on each burner. After moving in we realized the large back burner did not work. The light came on but the element never got hot. I of course replaced the element but that did not work. Several years passed and we just ignored the issue. We just got by with 3 burners. Lately we realized how much easier it would be to have all four burners working. Knowing that we will be selling our townhome soon we figured we should either fix the problem or replace the range.
I didn't want to call a repair man because I didn't want to be charged a $150 to have him come out and they to pay extra for parts (and of course a 2nd visit). So I went to www.Partselect.com and typed in the model of my range. Found the diagrams for my range and saw that from the switch ran a pair of wires to a Universal Receptacle (aka Terminal Block Kit). I figured since the Red light turns on when I turn the switch on it has to be the Terminal Block.
I ordered the part from www.Partselect.com ($14.00 including shipping) and replaced the part. The burner still would not get hot. I decided to test the switch. I removed the Control Panel cover (which is secure by 2 screws just below the digital clock). Once the cover was off, I saw the Blue wires going from the switch to the Terminal Block. To test the switch, I disconnected the two Blue Wires from connectors H1 and H2 and temporarily connected them to H1 and H2 of another switch. Sure enough, when I turned the other switch the element got hot.
So I placed another order from www.Partselect.com for a replacement switch ($50 including shipping). When that part came, I flipped the electrical circuit going to the range. I then removed the Control Panel cover again. With the new switch in hand (holding it near the old switch still attached to the Control Panel, I used the pliers to pull out each wire from it's connector and place it to it's corresponding connector on the new switch. Once all the wires were connected to the new switch, I pulled the knob of the switch off then used a phillips screwdriver to remove the two screws holding the switch to the control panel. I replaced the old switch with the new one put the screws back in, replaced the knob. Turned the circuit back on and tested to make sure that the element got hot. When it did, then I replaced the Control Panel cover and enjoyed a nice dinner that was cooked in less time than we're accustomed to because of the new burner. So I spent a total of $64.00 to fix our range. Less than half the amount I would've spent if I called for a technican. And far less then buying a new range.
Partselect is a great resource for information. They have diagrams and schematics available to view and/or download. And when ordering it's a snap because there's an "Add to Cart" button next to each part it lists. So there's no confusion. I've already recommended Partselect.com to about 5 people. And will continue to do so!!
Initially, I tested the temperature sensor and it was OK. I pulled out the range and shut off the circuit breaker to it. I removed the upper back sheet metal panel to expose the clock timer. I removed the 4 screws to it, unplugged the wires to it and plugged them into the new clock timer. I carefully removed the plastic facing stuck to the face of the old clock timer and stuck it on the new clock timer. No new adhesive was necessary. I placed the newly connected clock timer in position and secured it with the 4 screws that secured the old clock timer. I pushed the range back into position and reset the circuit breaker. I turned the oven on and the problem was resolved.
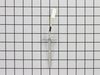
Turned off power, took back off stove removed old probe. I had to splice wires since new probe ends did not match up. the instructions were to splice the wires. I had the breaker off for about 3 hours. this is not in the instructions, but being a widow, I had to ask a few people why it would not come on after I connected the wires. After waiting, I turned the breaker on and my range came back on.